Cutline Studio User Manual
Version: 1.0.7
Updated: 2026-08-11
Published by: Beloved Dog
A desktop app that turns a plain-language brief into a video generation prompt with references, timing, camera, audio, and end state all worked out. It supports Seedance 2.0 and 2.5.
00 Read this first: your OS will show a warning
When you install and launch the app for the first time, your operating system will show a security warning. Nothing is broken and no file is damaged.
This app does not carry a paid code signature, so the OS reports that it cannot verify the publisher. You can continue with the steps below.
- Windows: "Windows protected your PC" → More info → Run anyway
- Mac: "cannot verify the developer" → right-click the app (or Control-click) → Open → Open again
On a Mac this is only needed the first time. From the second launch onward, a normal double-click works. A plain double-click on the first launch shows "cannot be opened because the developer cannot be verified" and the app will not start.
Step-by-step instructions with screenshots are in "03 Installing and launching".
01 Introduction
Cutline Studio walks through the conditions a video generation needs, in order, and assembles them into a prompt you can copy.
What this app does
- Turns your brief into an ordered video generation prompt
- Gives you 27 knowledge entries, filterable by model and by evidence level
- Organises reference numbers, roles, and which attributes to use or exclude
- Runs 25 static checks over your input and points out contradictions and weak phrasing
- Lets you edit the finished prompt directly, and save and restore it as TXT and JSON
- Shows the model conditions we could confirm in official documentation, with the source and the date it was verified
Automatic drafting with a local AI (an AI that runs inside your computer) is optional. Everything above works without configuring it. The AI features also run entirely on the local AI, so there is no external AI service contract, no API key to obtain, and no extra API billing.
What this app does not do
- It does not generate video or audio. Generation happens on the video service you use
- It does not upload, store, or transmit your asset files. It works only with their numbers and roles
- It does not guarantee the quality of a generation. Character consistency, physics, dialogue, pronunciation, subtitles, and sound must be checked in the real output
- It does not guarantee model or service specifications. Official specifications change without notice and differ by plan and region. If the app and the service disagree, the service is right.
About changes to external services
This app helps you write prompts. It does not guarantee what a video generation service produces. If Seedance or ByteDance change model names, prompt interpretation, reference-image behaviour, duration, resolution, input limits, UI, safety limits, or regional availability, the same prompt may stop producing the same result. When that happens, treat the service's own screen as authoritative and carry on — the way this app builds prompts is unaffected.
02 The shortest path
If this is your first time, work in this order.
- Launch the app and open "Prompt builder".
- Pick a production preset in STEP 00. Skip it if you would rather not.
- Set the production type, duration, aspect ratio, look, camera, and audio in STEP 01.
- Only if you use references, register the roles for
@Image 1and so on in STEP 02. - If a character appears in more than one scene, add a character profile in STEP 03.
- Build non-overlapping time ranges in STEP 04 and fill in subject, action, location, camera, dialogue, and audio.
- Set the overall continuity, exclusions, and end state in STEP 05.
- Read the finished prompt in STEP 06 and edit anything you want directly.
- Check the errors and warnings in STEP 07.
- Use "Copy" or "Save TXT" to move it to the video generation service you use.
A safe default when you are unsure
| Setting | Where to start |
|---|---|
| Target model | Whichever Seedance version you actually use |
| Preset | Pick the closest purpose, then adjust |
| Change per beat | Hold each beat to one main change |
| Camera | One main move per beat |
| End state | Describe the frame that leads into the next cut |
03 Installing and launching
Read this first
This app is not signed with a developer certificate (Apple Developer ID or Windows code signing). Your OS will therefore warn you on first launch. This is not a fault. The steps below will open it. Please buy with this in mind.
Mac
- Open
Cutline-Studio-1.0.7-English.pkgand follow the installer. - In the Applications folder, right-click (or Control-click) "Cutline Studio English" and choose "Open".
- When "cannot verify the developer" appears, press "Open" once more.
- From the second launch onward, a normal double-click works.
A plain double-click shows "cannot be opened because the developer cannot be verified" and will not start the app. Always use right-click → Open the first time.
Windows
- Open
Cutline-Studio-1.0.7-English.exe. - If "Windows protected your PC" appears, press More info → Run anyway.
- After installation, launch it from the desktop or the Start menu.
Normal use needs no Node.js, no npm, no terminal, no PowerShell, and no browser work. Everything the app needs is inside the app. Do not use files from an unknown source or a modified installer.
If it will not start
- Quit the app completely and open it again.
- Check whether security software is blocking it.
- Restart the computer, then open it.
- If that does not help, uninstall (chapter 11) and reinstall. Your drafts survive.
04 Reading the screen
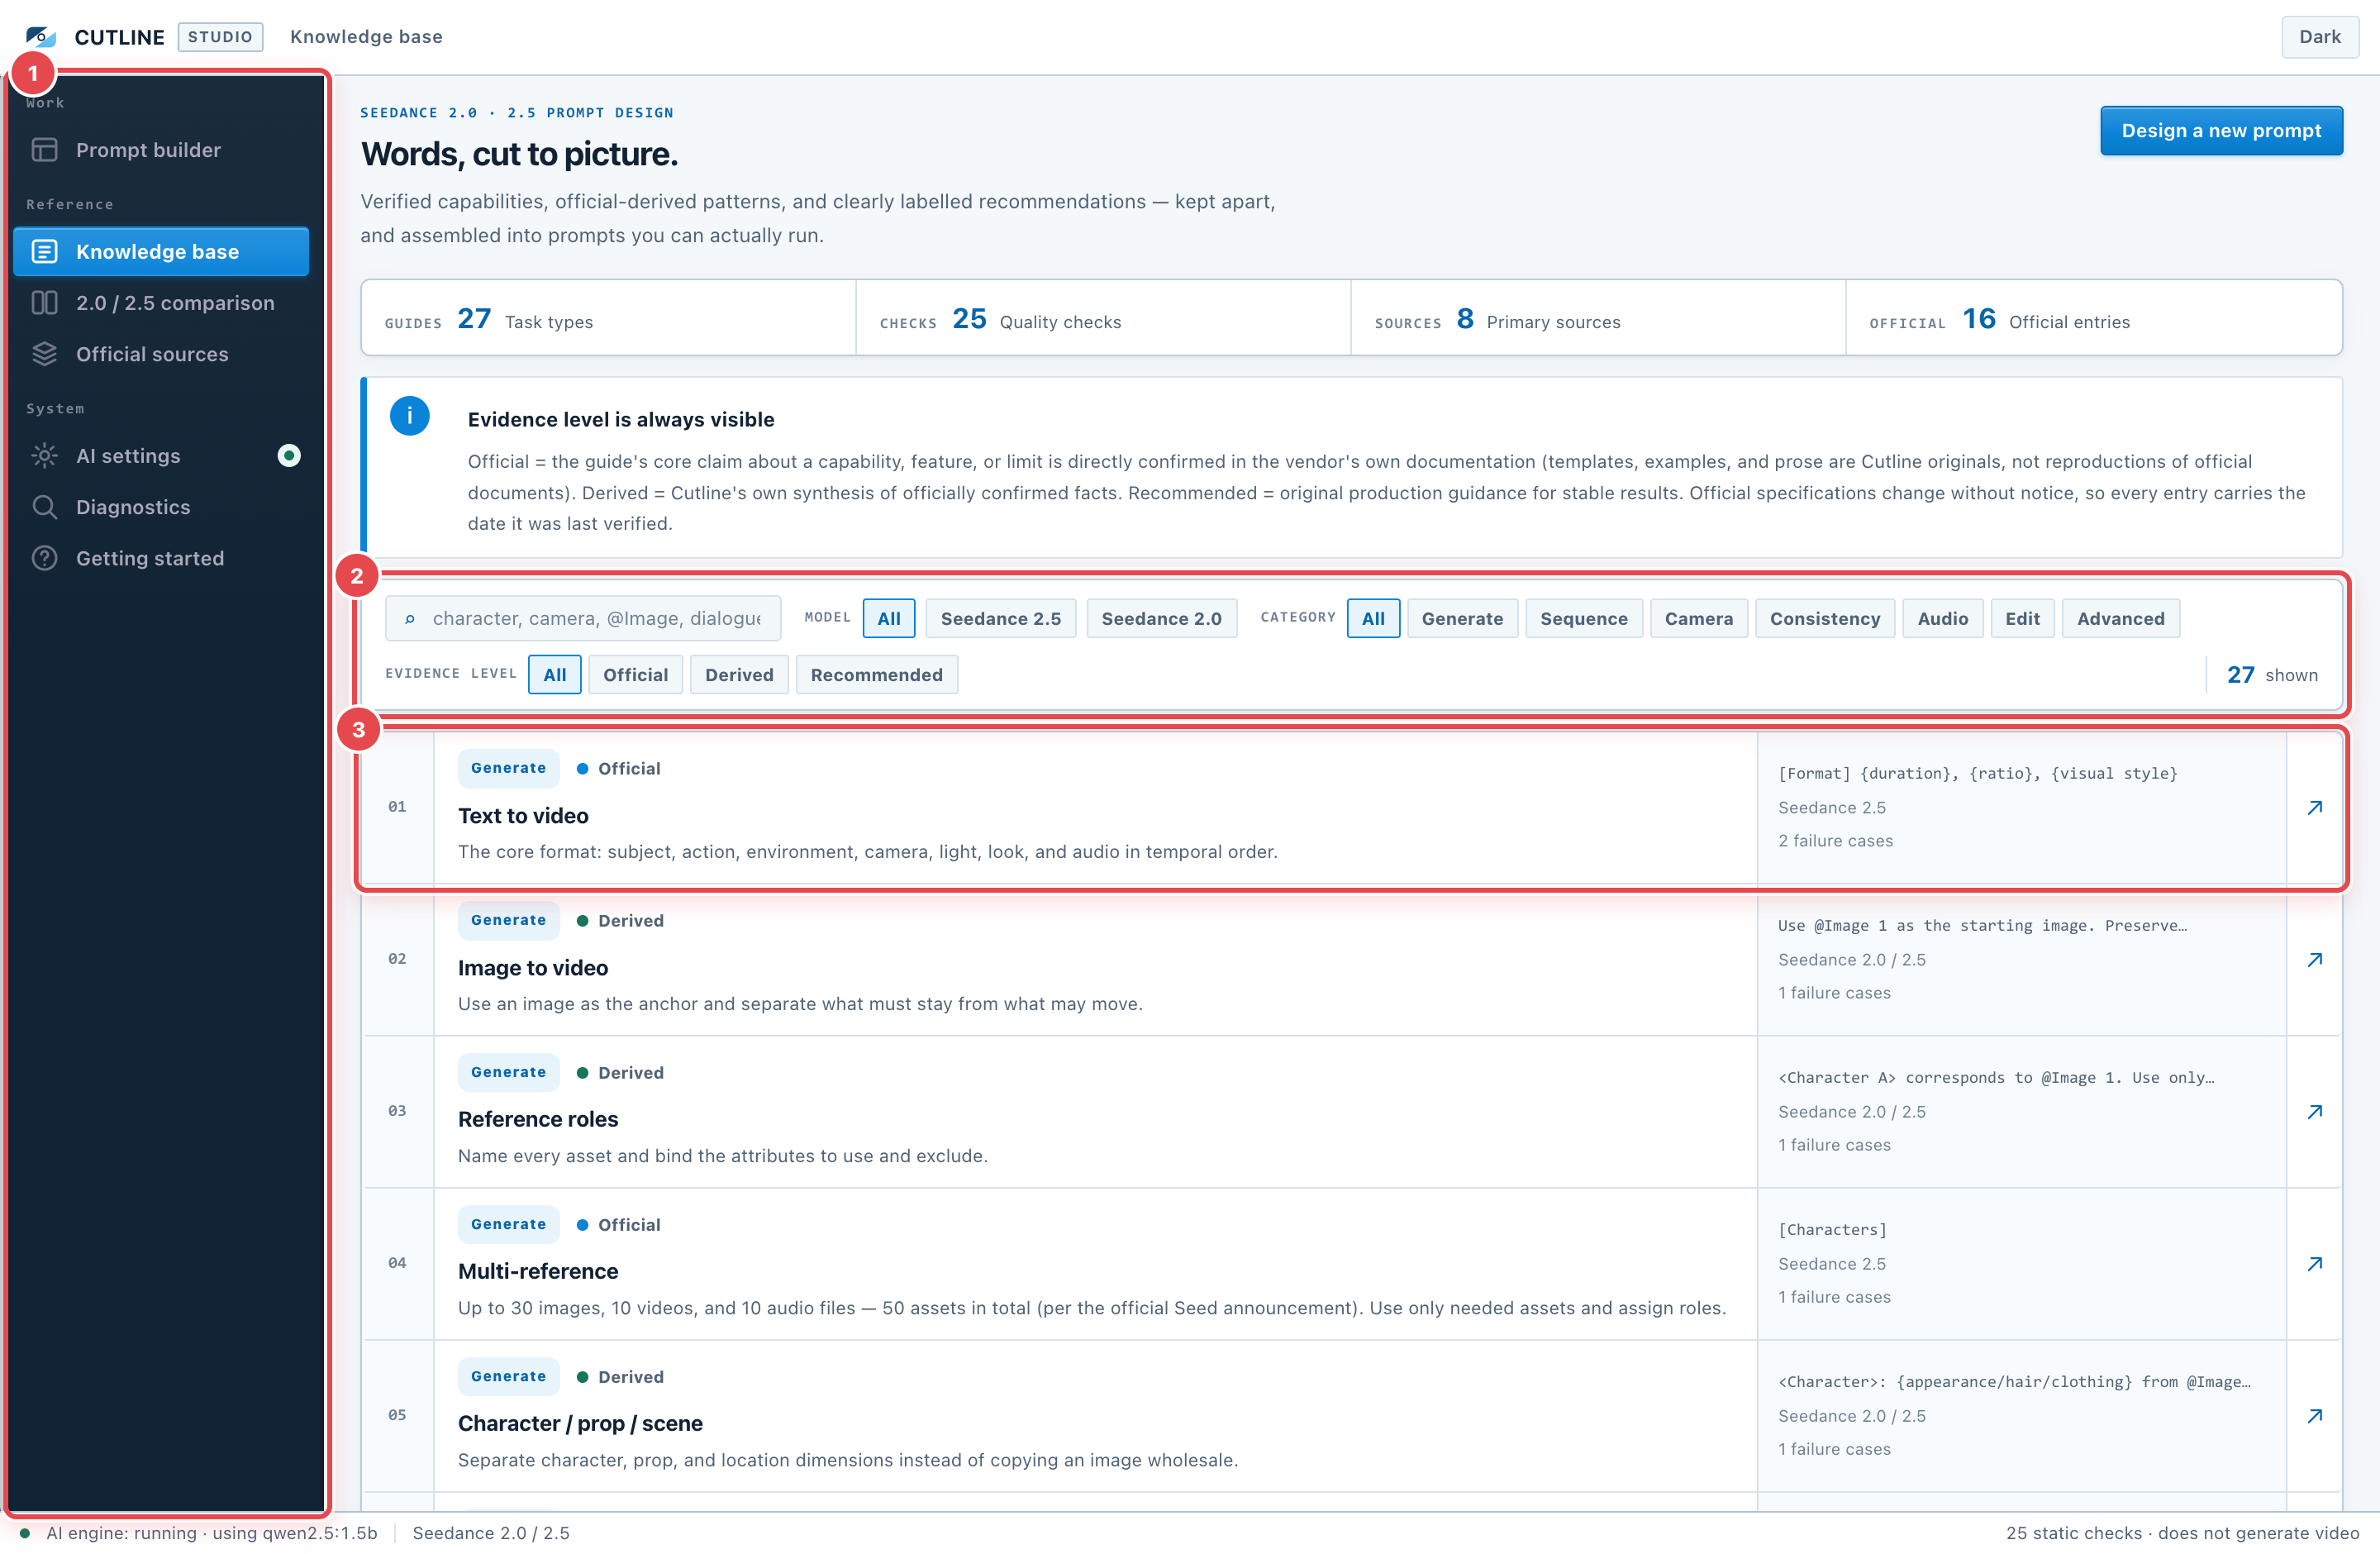
The window has four parts.
| Area | Role |
|---|---|
| Title bar (top) | The name of the current screen, and the theme switch |
| Left rail (①) | Switches screens across three groups: work, reference, system |
| Work area (centre) | The body of the selected screen. This is the only part that scrolls |
| Status bar (bottom) | Always shows the AI engine state and the supported models |
What is in the left rail:
| Menu | Role |
|---|---|
| Prompt builder | Enter your brief; produces the finished prompt and the quality checks |
| Knowledge base | Search and filter 27 prompt design guides |
| 2.0 / 2.5 comparison | Compare limits and verification status per model |
| Official sources | The primary sources consulted, with verification dates |
| AI settings | Measure this computer, set up the AI engine and models, switch the model in use |
| Diagnostics | Run diagnostics, fix common problems, reset to a clean state |
| Getting started | Short notes on usage, storage, and privacy |
The button at the right of the title bar switches the colour theme. Your theme and builder draft are saved automatically inside the app.
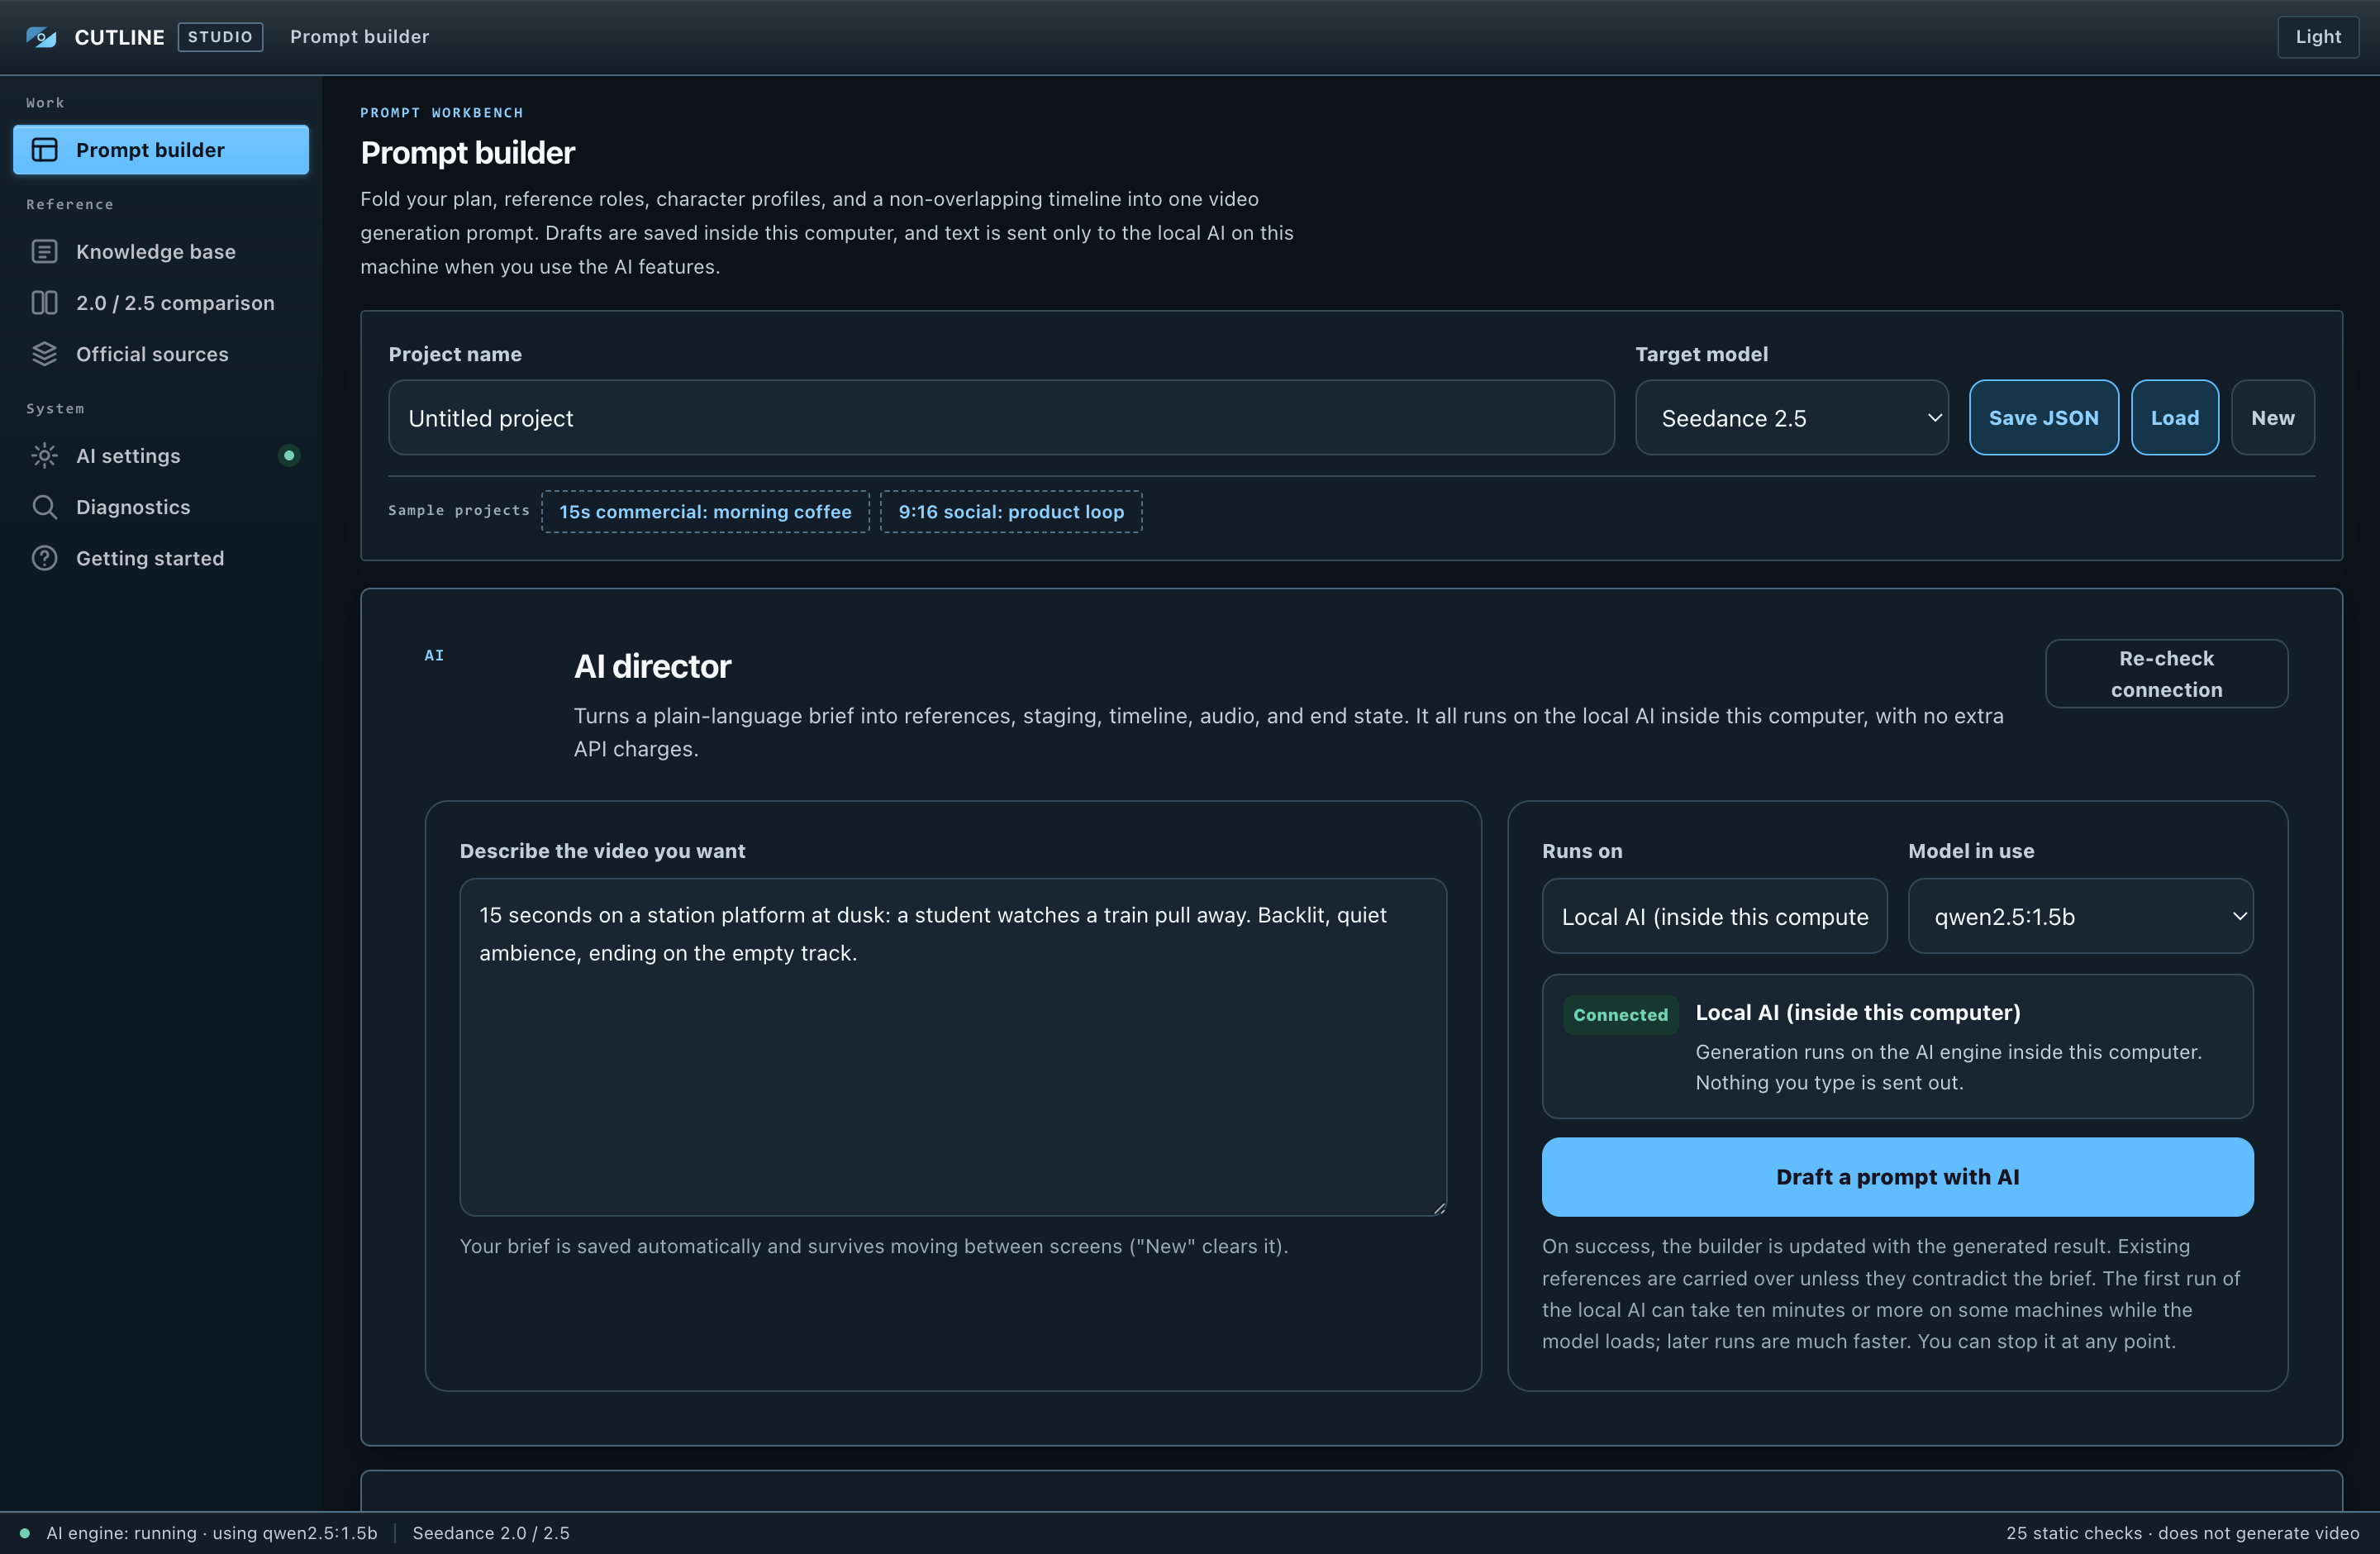
Using the knowledge base
- Search for things like "camera", "@Image", "dialogue", or "30 seconds".
- Narrow by model: Seedance 2.5 or Seedance 2.0.
- Switch category between generate, sequence, camera, consistency, audio, edit, and advanced.
- Separate entries by evidence level: official, derived, recommended.
- Press a row to see the template, worked examples, variants, failure cases, parameters, and official sources.
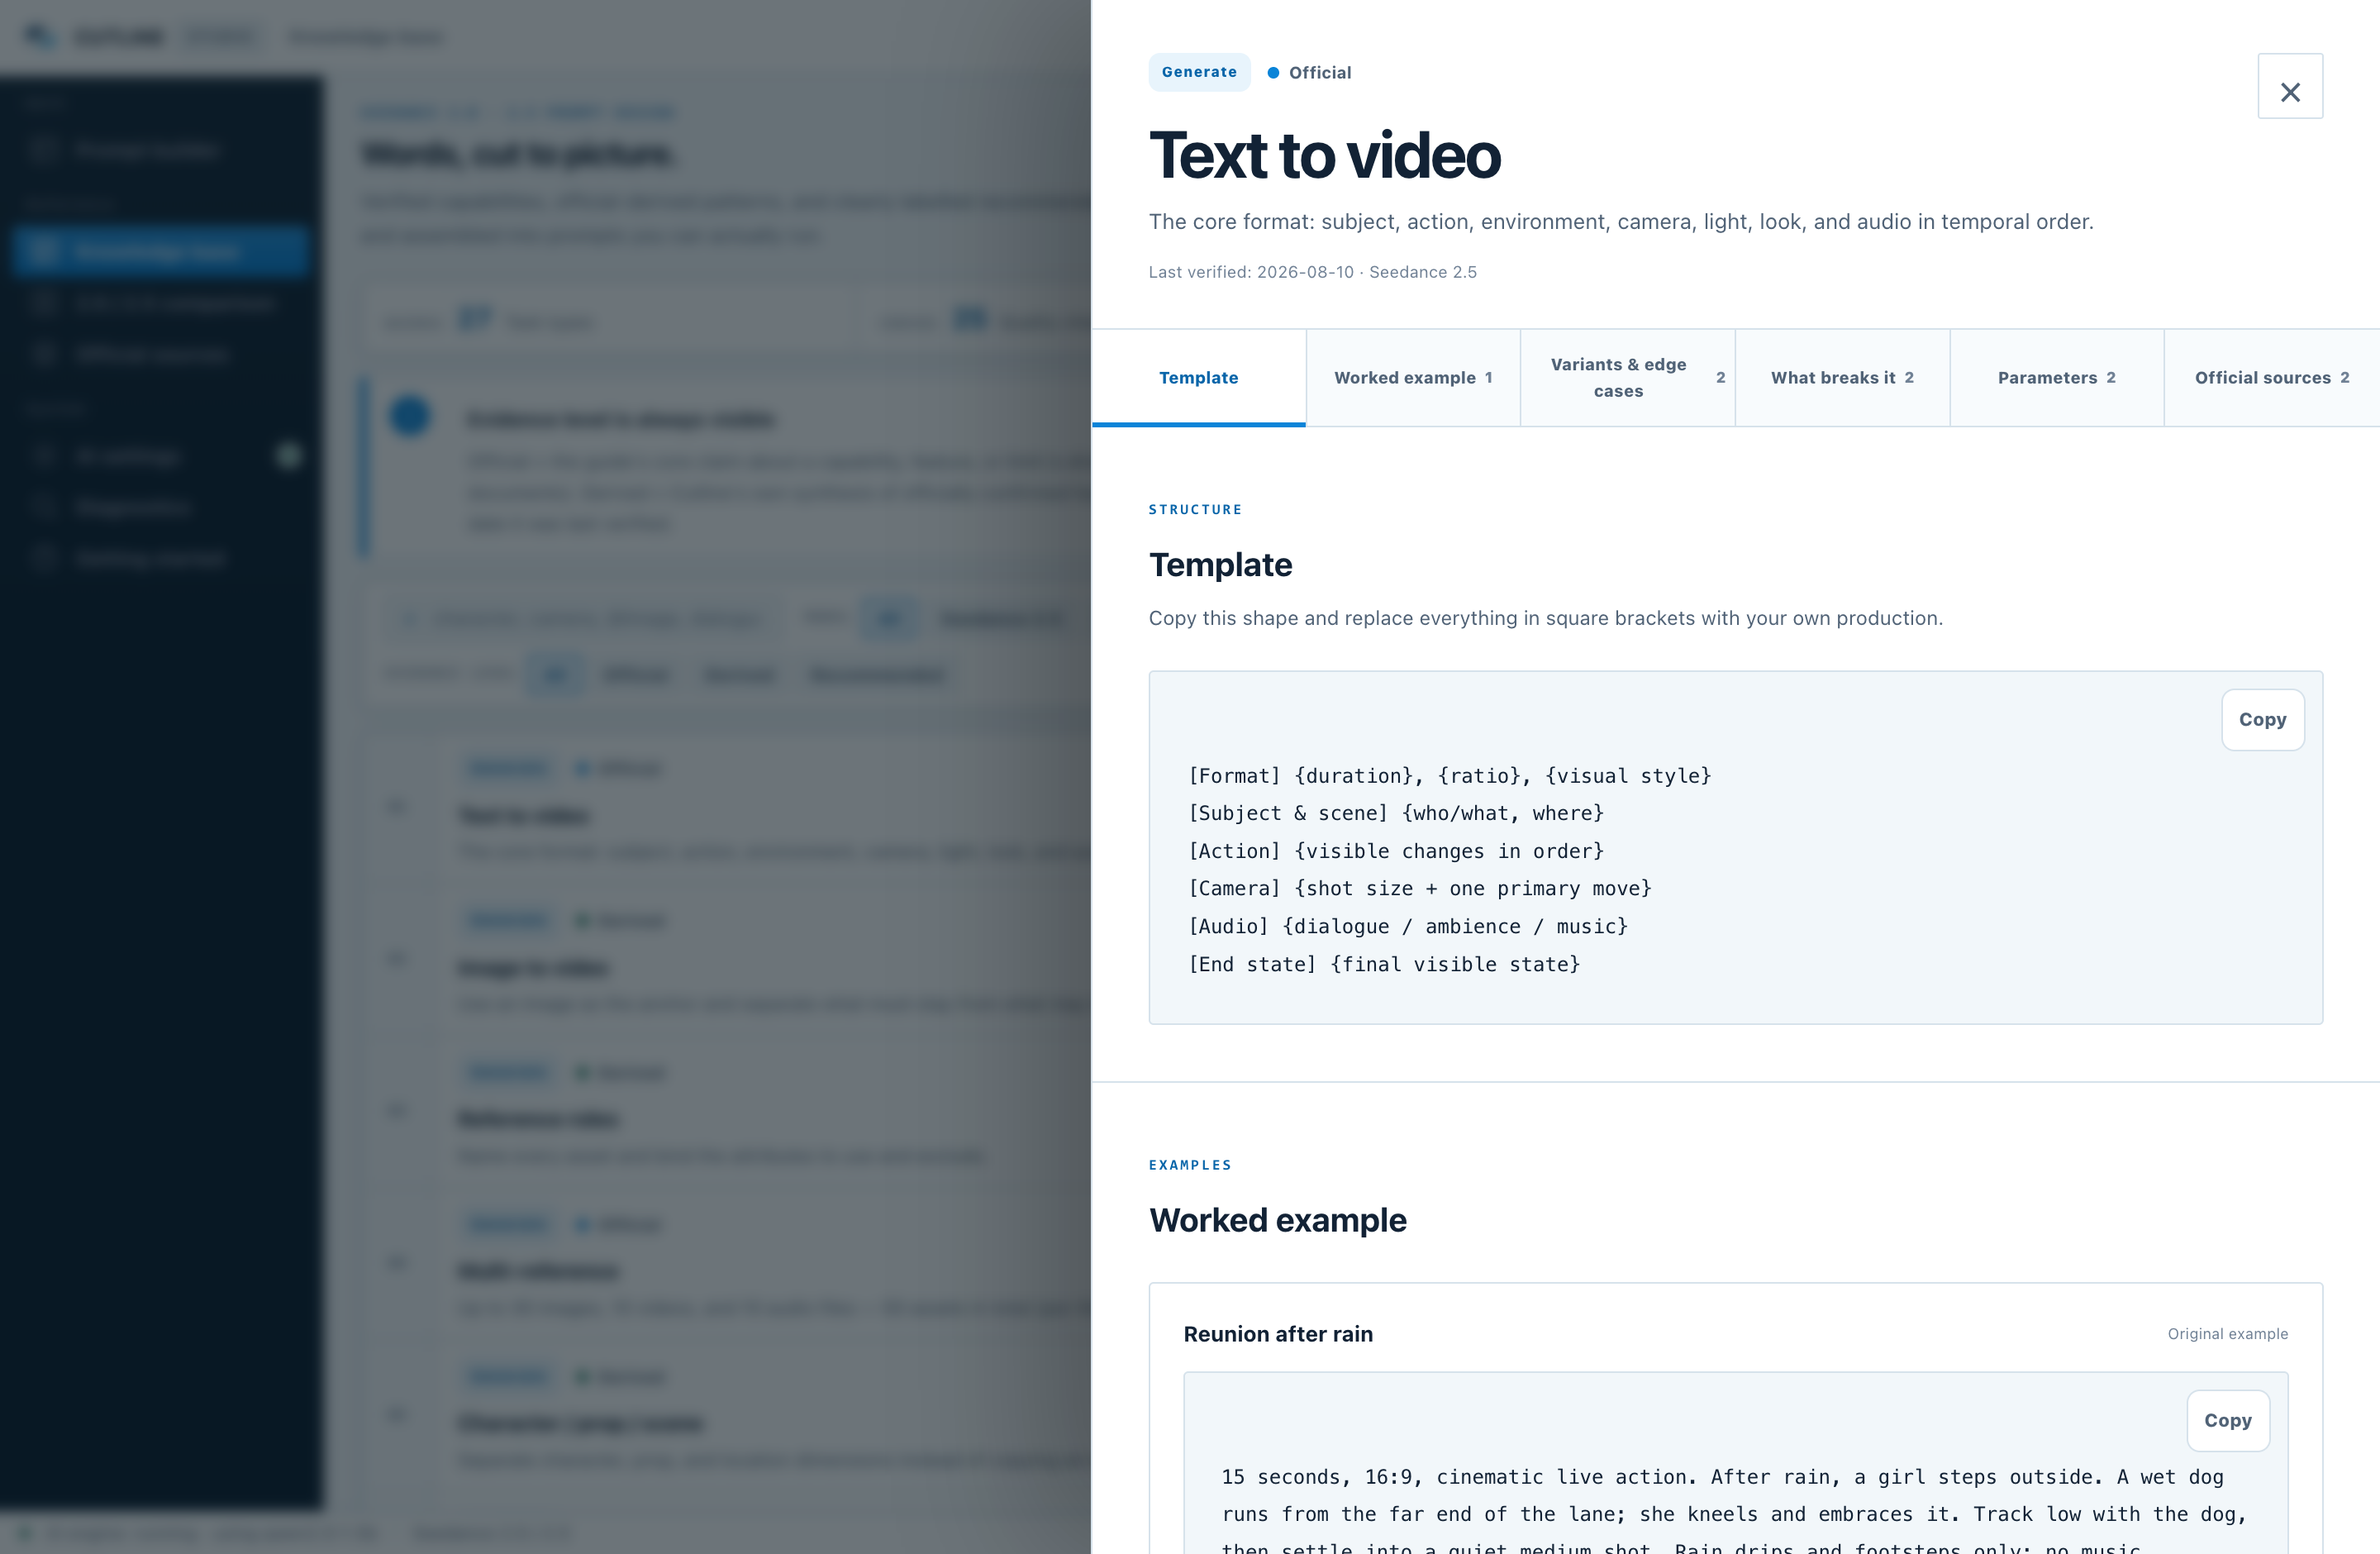
Evidence levels
| Label | Meaning |
|---|---|
| Official | The guide's core claim about a capability, feature, or limit was confirmed directly in the vendor's own documentation |
| Derived | Cutline's own synthesis of facts that were confirmed officially |
| Recommended | Original design guidance for keeping production stable |
At every evidence level, the templates, worked examples, and prose are written by Cutline. They are not reproductions of official text, prompts, or images.
05 The prompt builder
Project toolbar
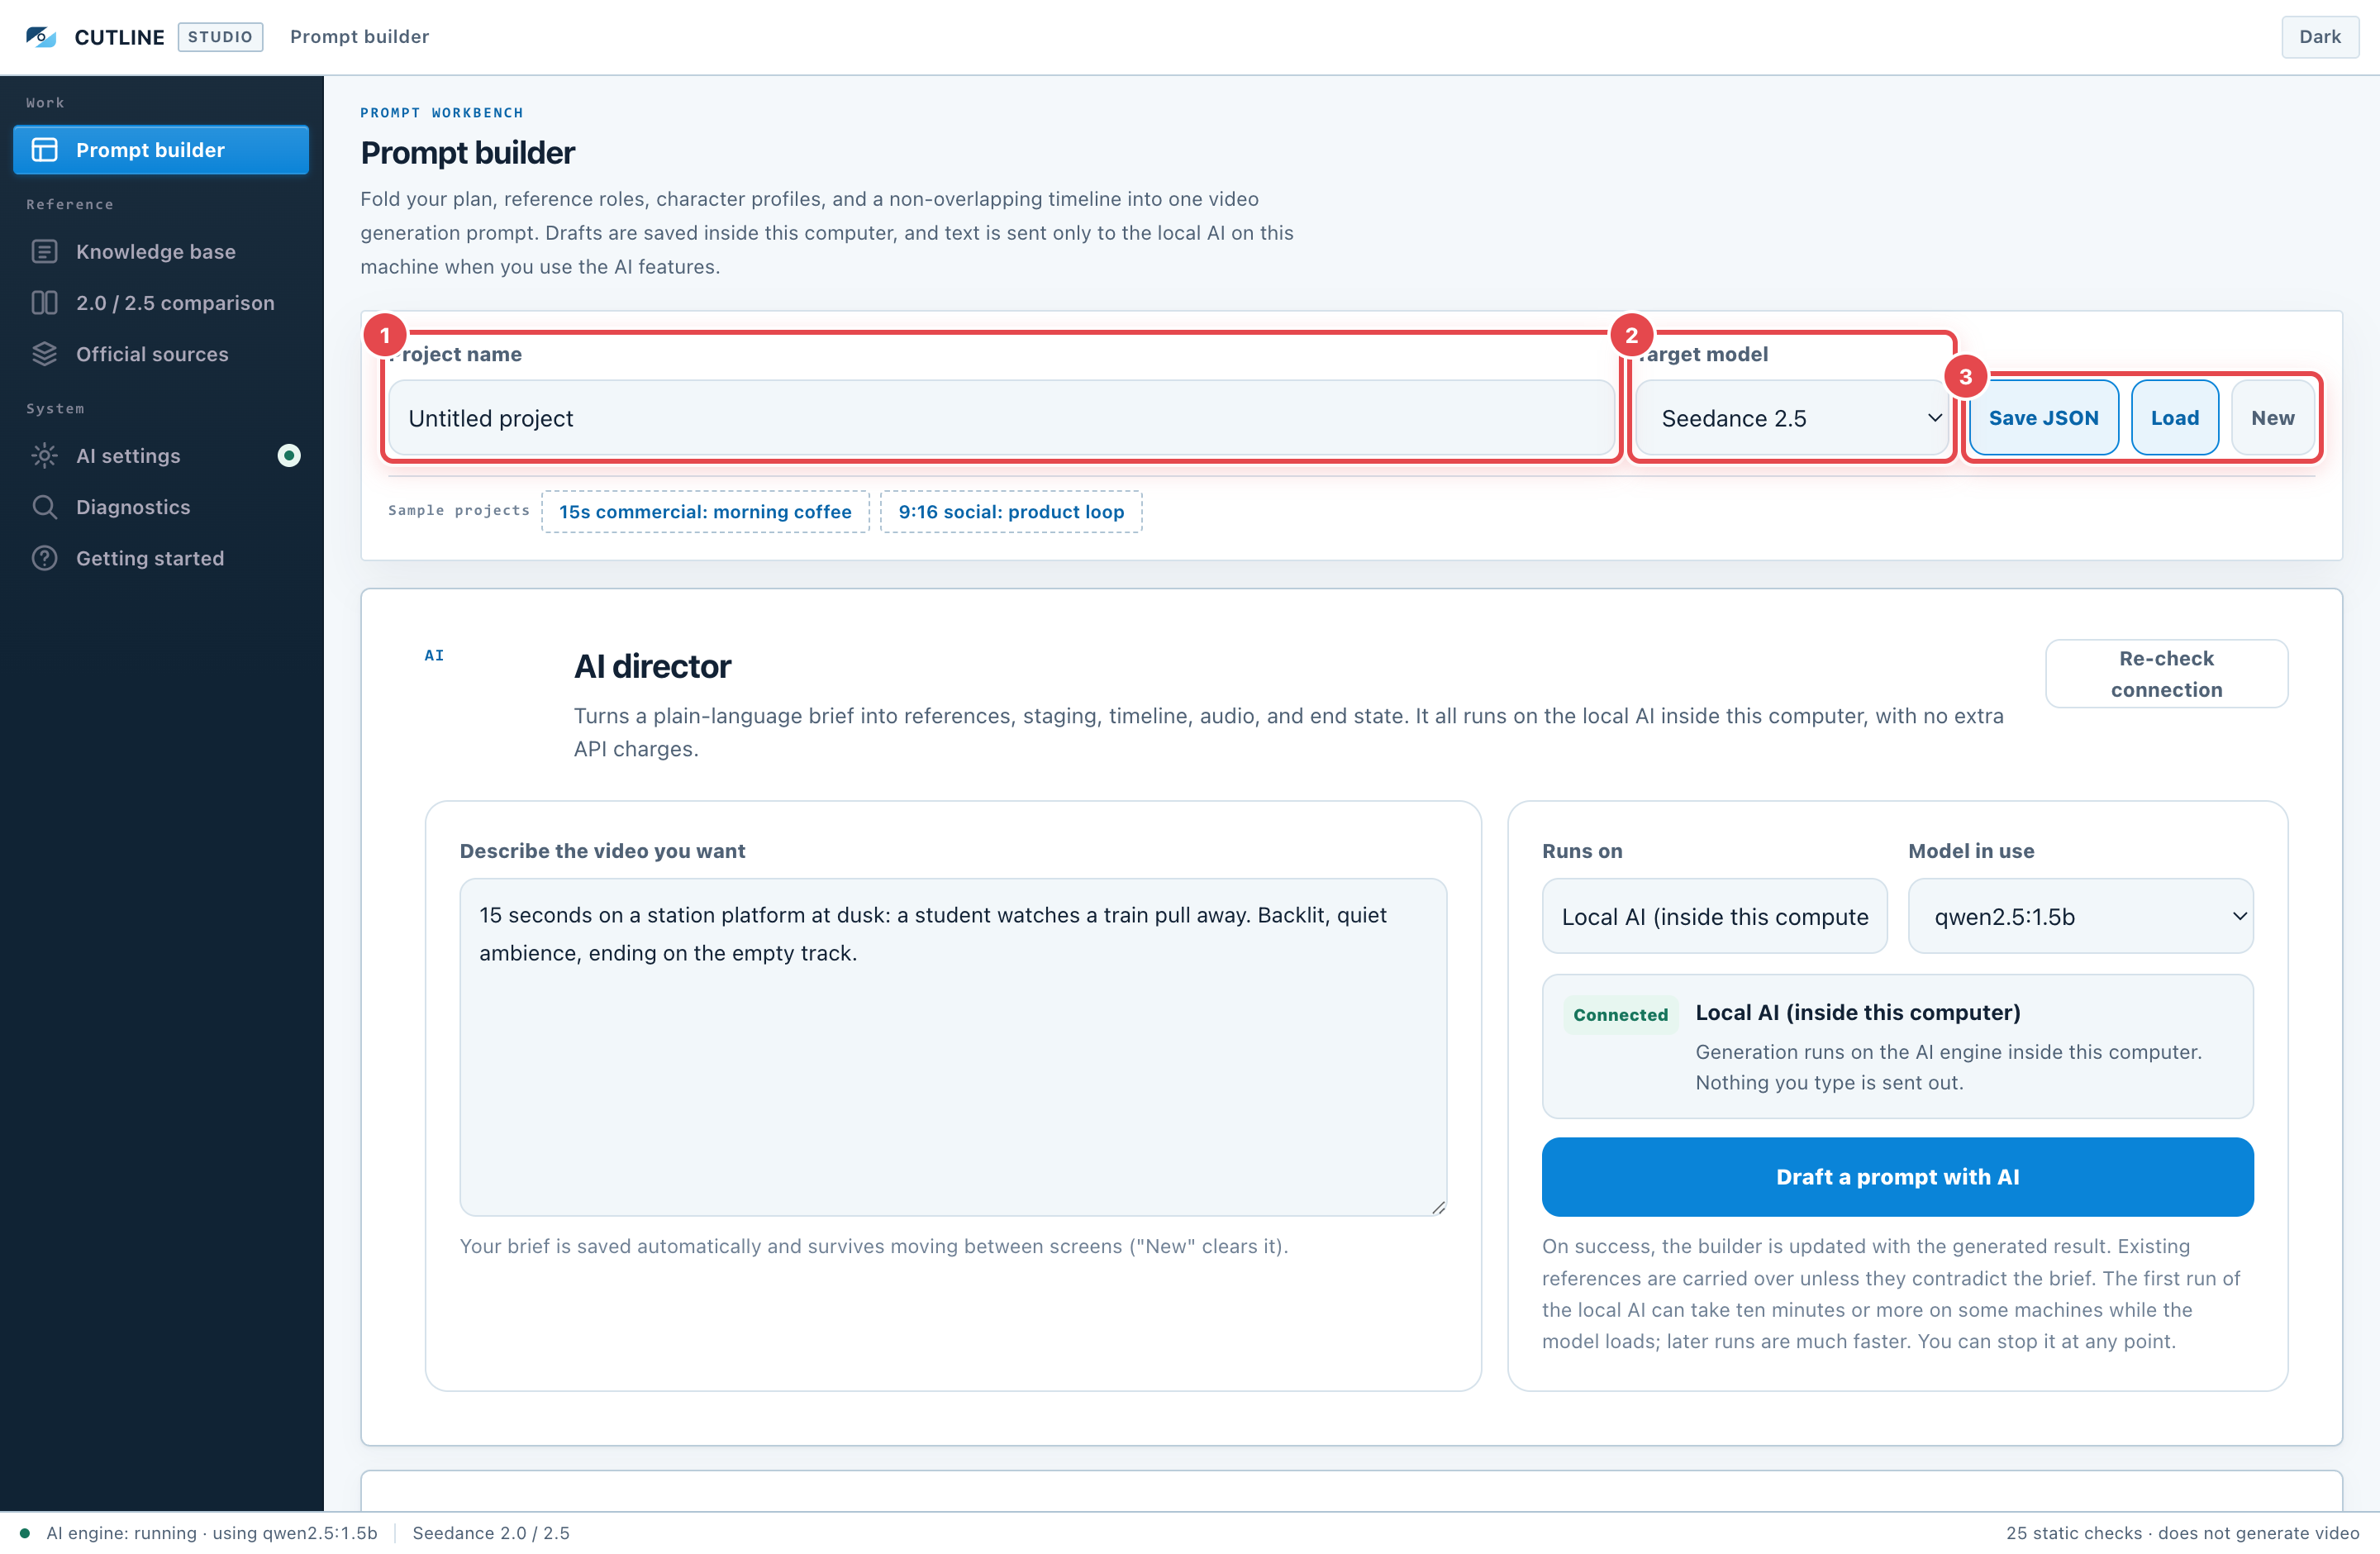
- Project name: used for the JSON and TXT filenames.
- Target model: switching between 2.0 and 2.5 changes both the output and the check conditions.
- Save JSON: backs up the whole builder.
- Load: restores a saved JSON.
- New: returns the current input to its initial state.
"New" cannot be undone. Save anything you want to keep as JSON first.
STEP 00 Production presets
A preset is a starting point. Every field stays editable after you apply one.
- Preset names match the options under "Basics > Production type" (live action, animation, music video, commercial, documentary).
- The selected preset is marked with a blue border, a check mark, and a "Selected" label. Choosing another preset moves the marking, and changing any value by hand clears it.
About the grey example text in empty fields
Empty fields show light grey example text such as "e.g. school rooftop after classes". It is only a hint about how to write. It is never treated as input, and never appears in the finished prompt, in Save JSON, in Save TXT, or in anything sent to the AI. An empty field stays empty.
STEP 01 Basics
| Field | What to write |
|---|---|
| Production type | Live action, animation, commercial, music video, documentary, social |
| Duration | Varies with the model you chose (pick from the options shown) |
| Aspect ratio | Varies with the model you chose. A custom ratio is also possible |
| Overall look | Texture, lighting, colour, period, photographic treatment |
| Camera | The shooting approach to hold throughout |
| Audio | Ambience, effects, music, conditions for silence |
| Dialogue language | The language characters speak |
STEP 02 Reference assignments
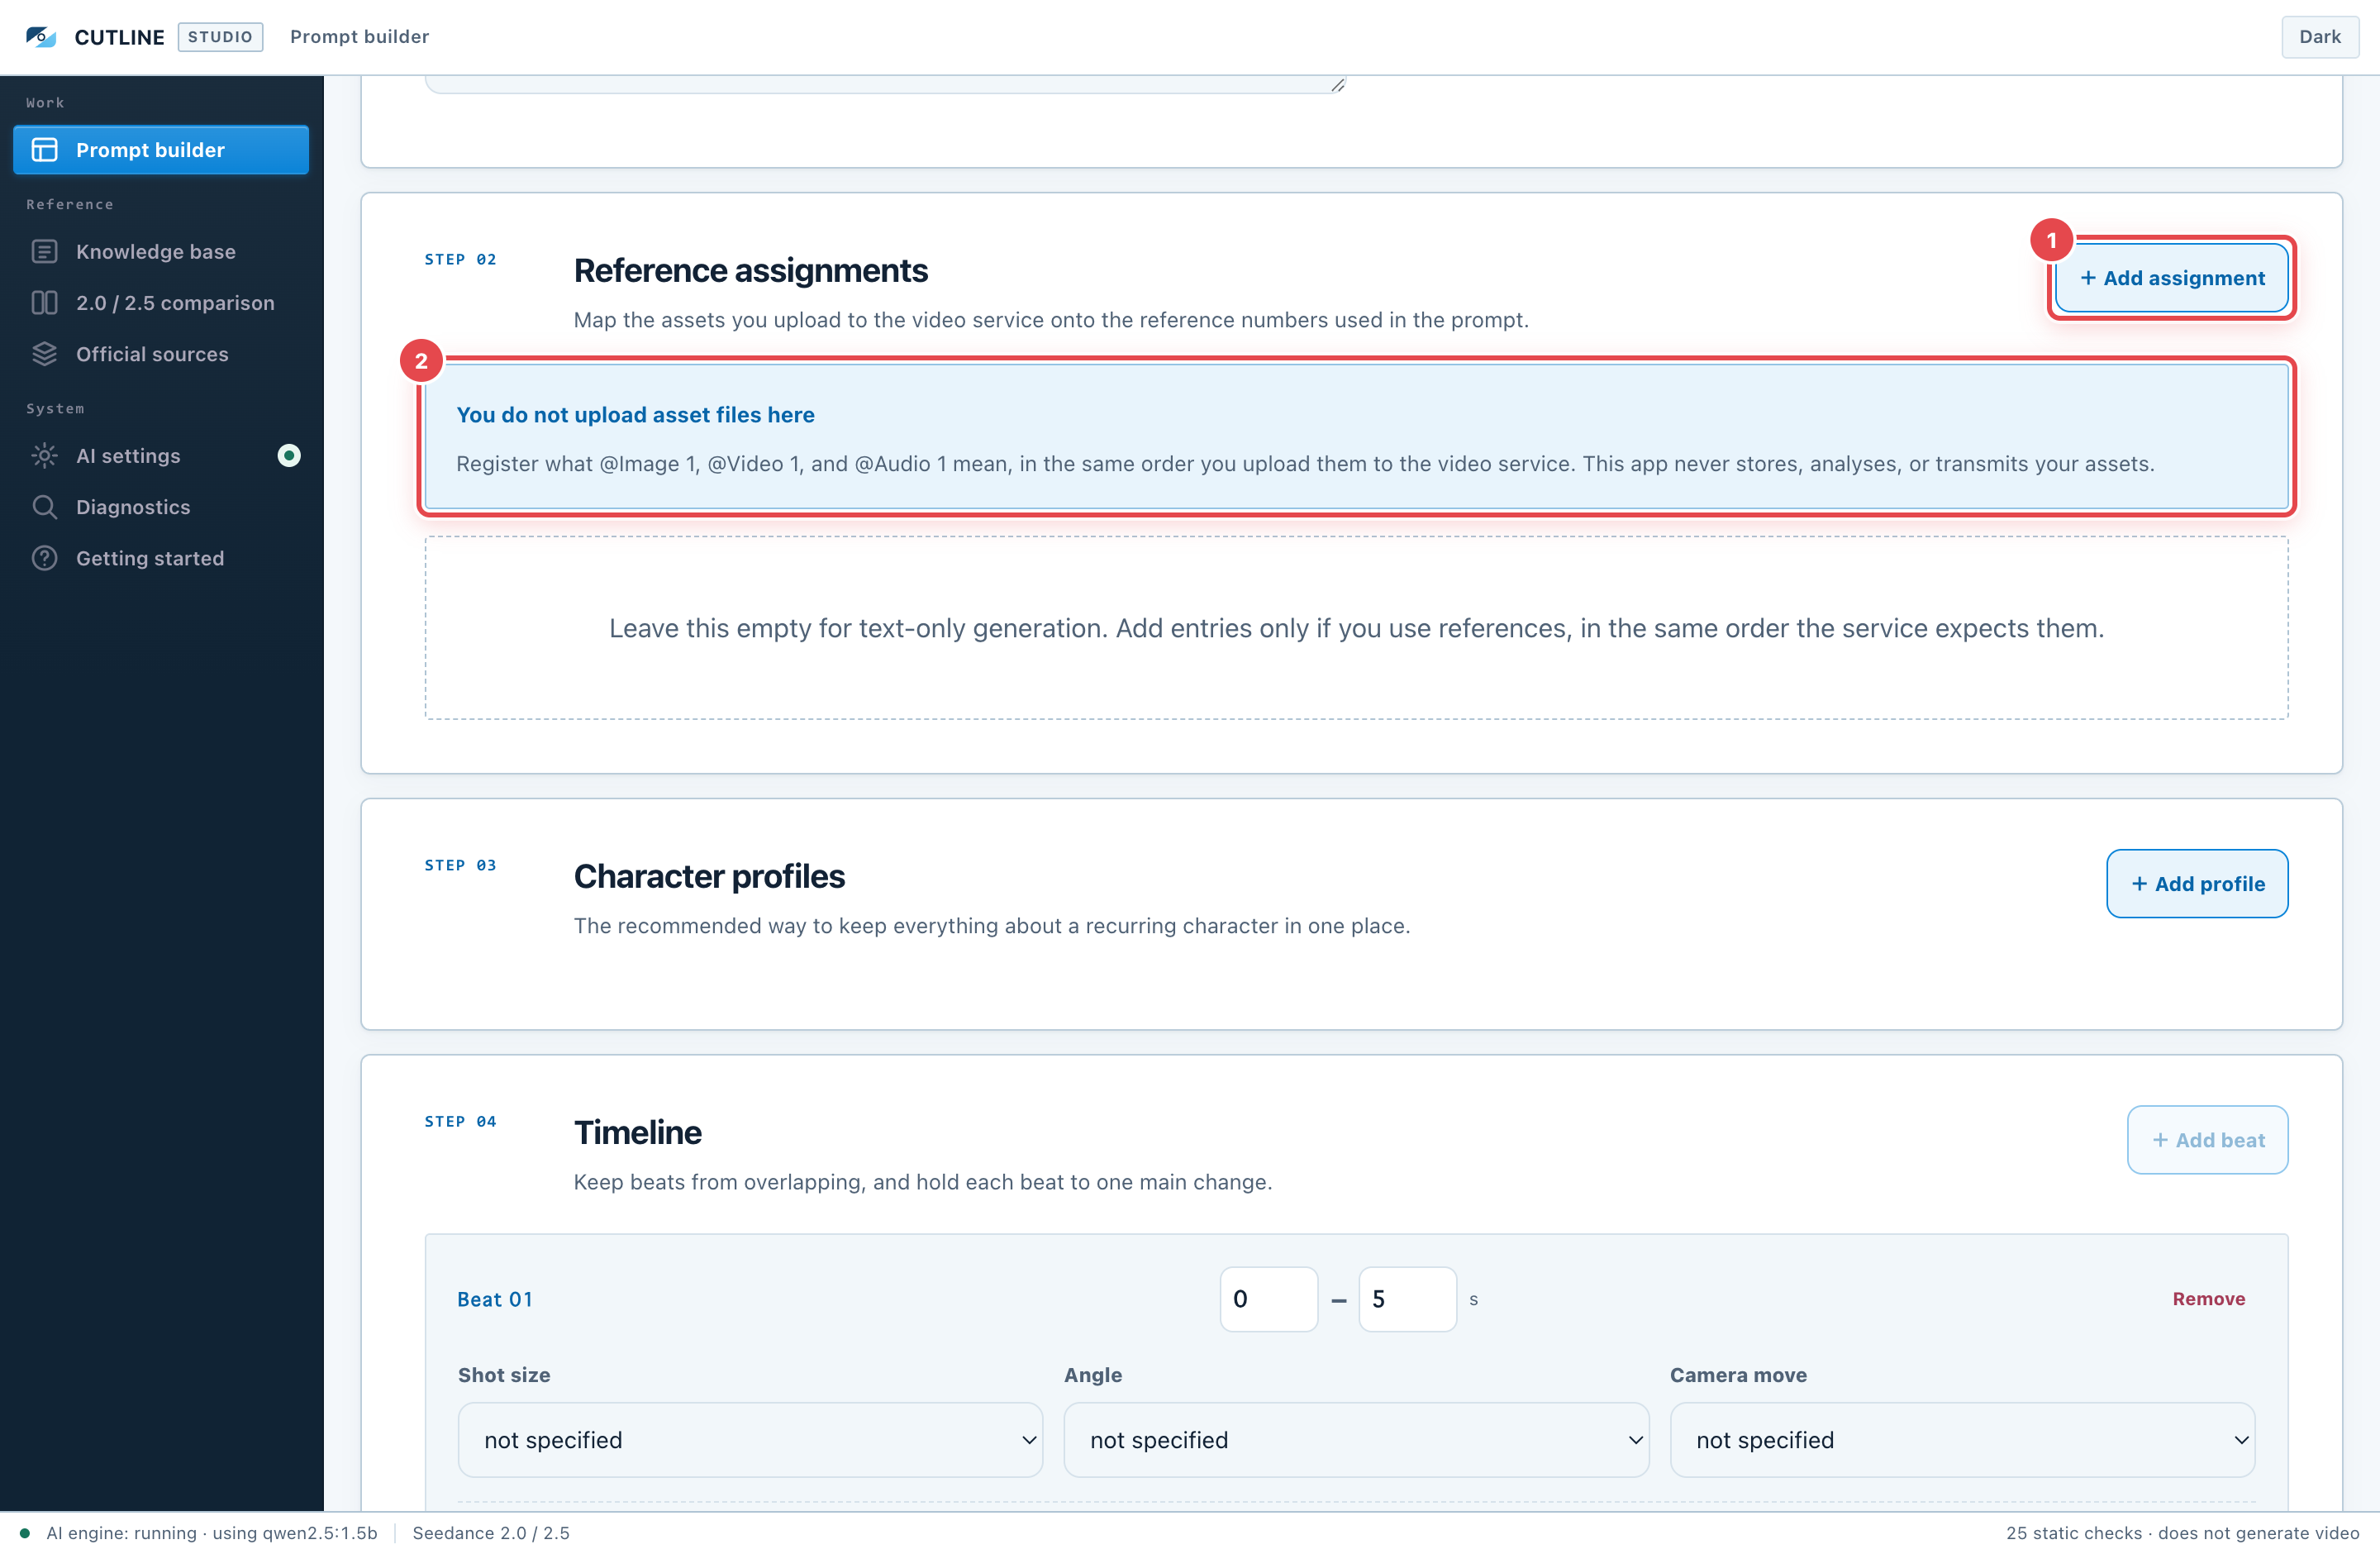
You do not upload asset files here. You map the order in which you upload them to the video service onto the numbers used in the prompt.
First image on the Seedance side = @Image 1
First video on the Seedance side = @Video 1
First audio on the Seedance side = @Audio 1
For each asset, separate what to take from it and what not to take. For a character image you might take appearance and clothing but not the background.
"Use images 1 to 4 for the characters" leaves the mapping ambiguous. Say it one at a time: character A is @Image 1, character B is @Image 2.
06 Characters, time, continuity
STEP 03 Character profiles
Use these when the same character appears in several scenes.
- Name
- References for appearance and clothing
- Props that must stay fixed
- Where they appear
- Motion reference
- Attributes that must not bleed in from other characters
For a simple single-scene video, leaving character profiles empty is fine.
STEP 04 Timeline
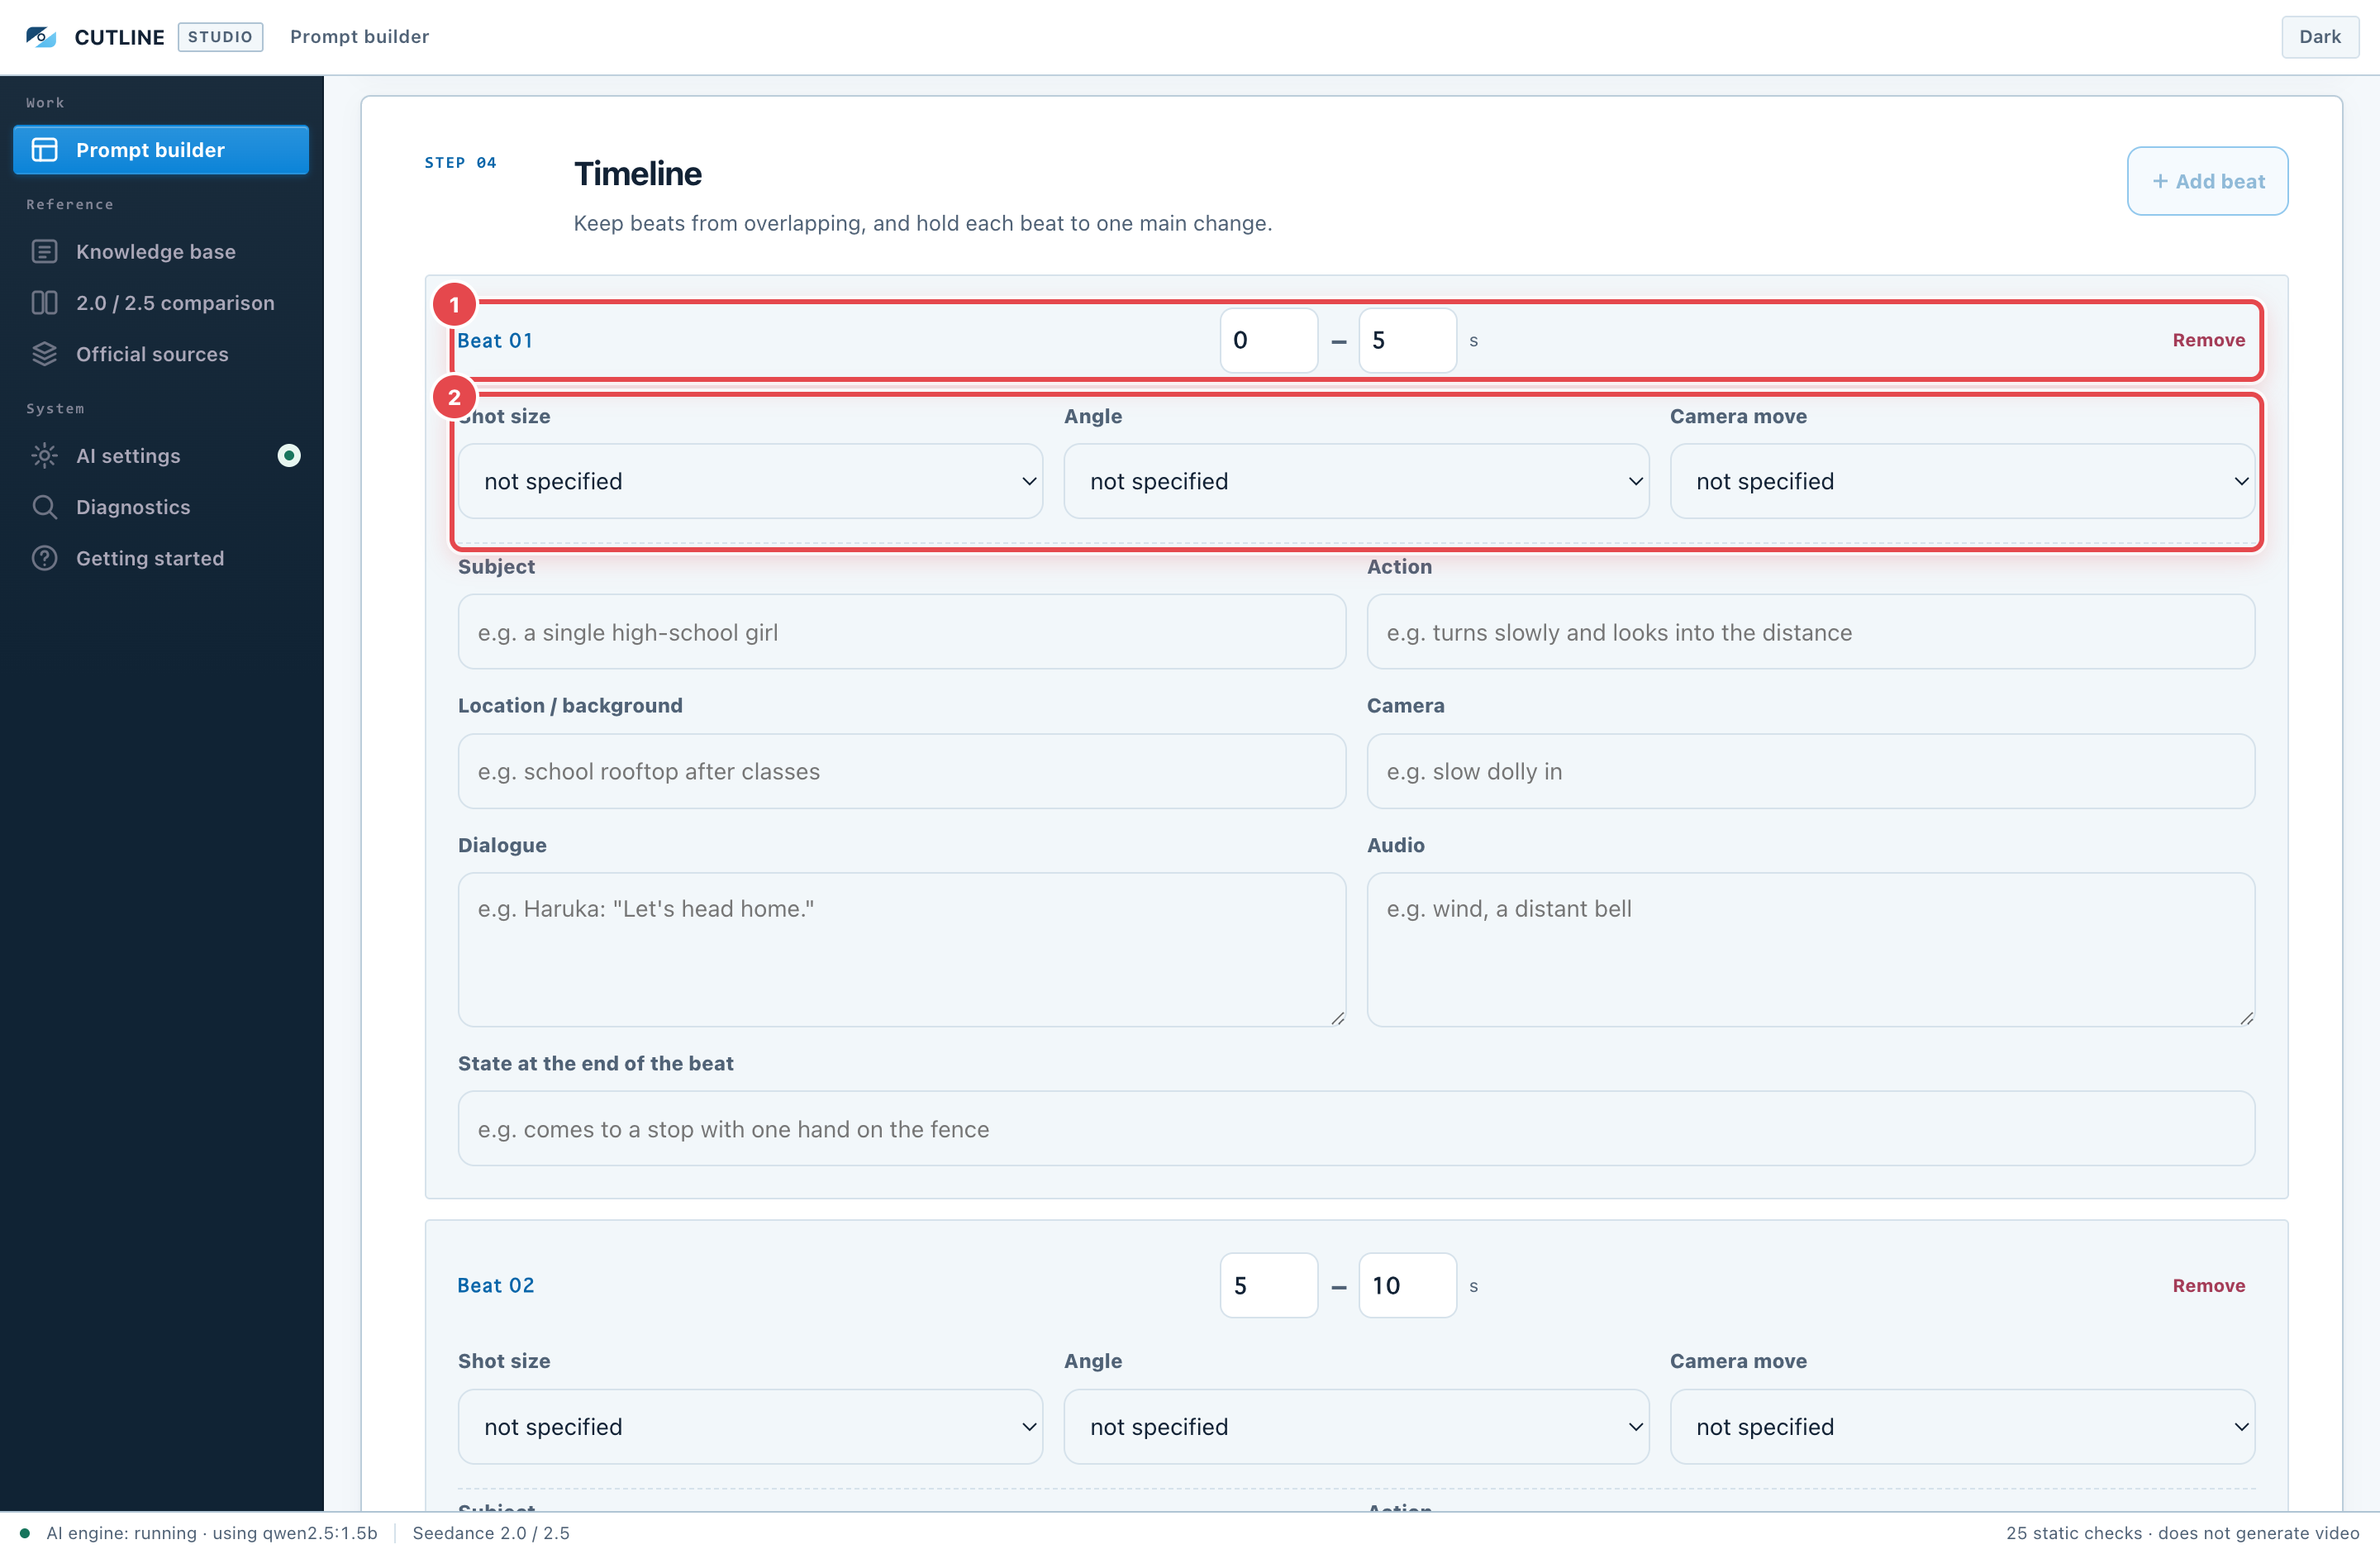
Time ranges must not overlap, and should run continuously from start to end.
0-5s:   Setup. The character enters from frame left.
5-10s:  They stop centre frame and look at their hands.
10-15s: The camera pushes in and ends on their expression.
Each beat takes a subject, action, location, camera, dialogue, audio, and the state at the end of the beat.
STEP 05 Continuity and end state
- Continuity: face, hair, clothing, props, weather, time of day, left/right positions — whatever must hold across every beat
- Exclusions: subtitles, logos, extra people, unwanted camera moves — whatever must not appear
- End state: in the final frame, who is where, holding what, and where the camera comes to rest
An end state can be reused as the opening condition of the next cut.
07 The finished prompt and the quality checks
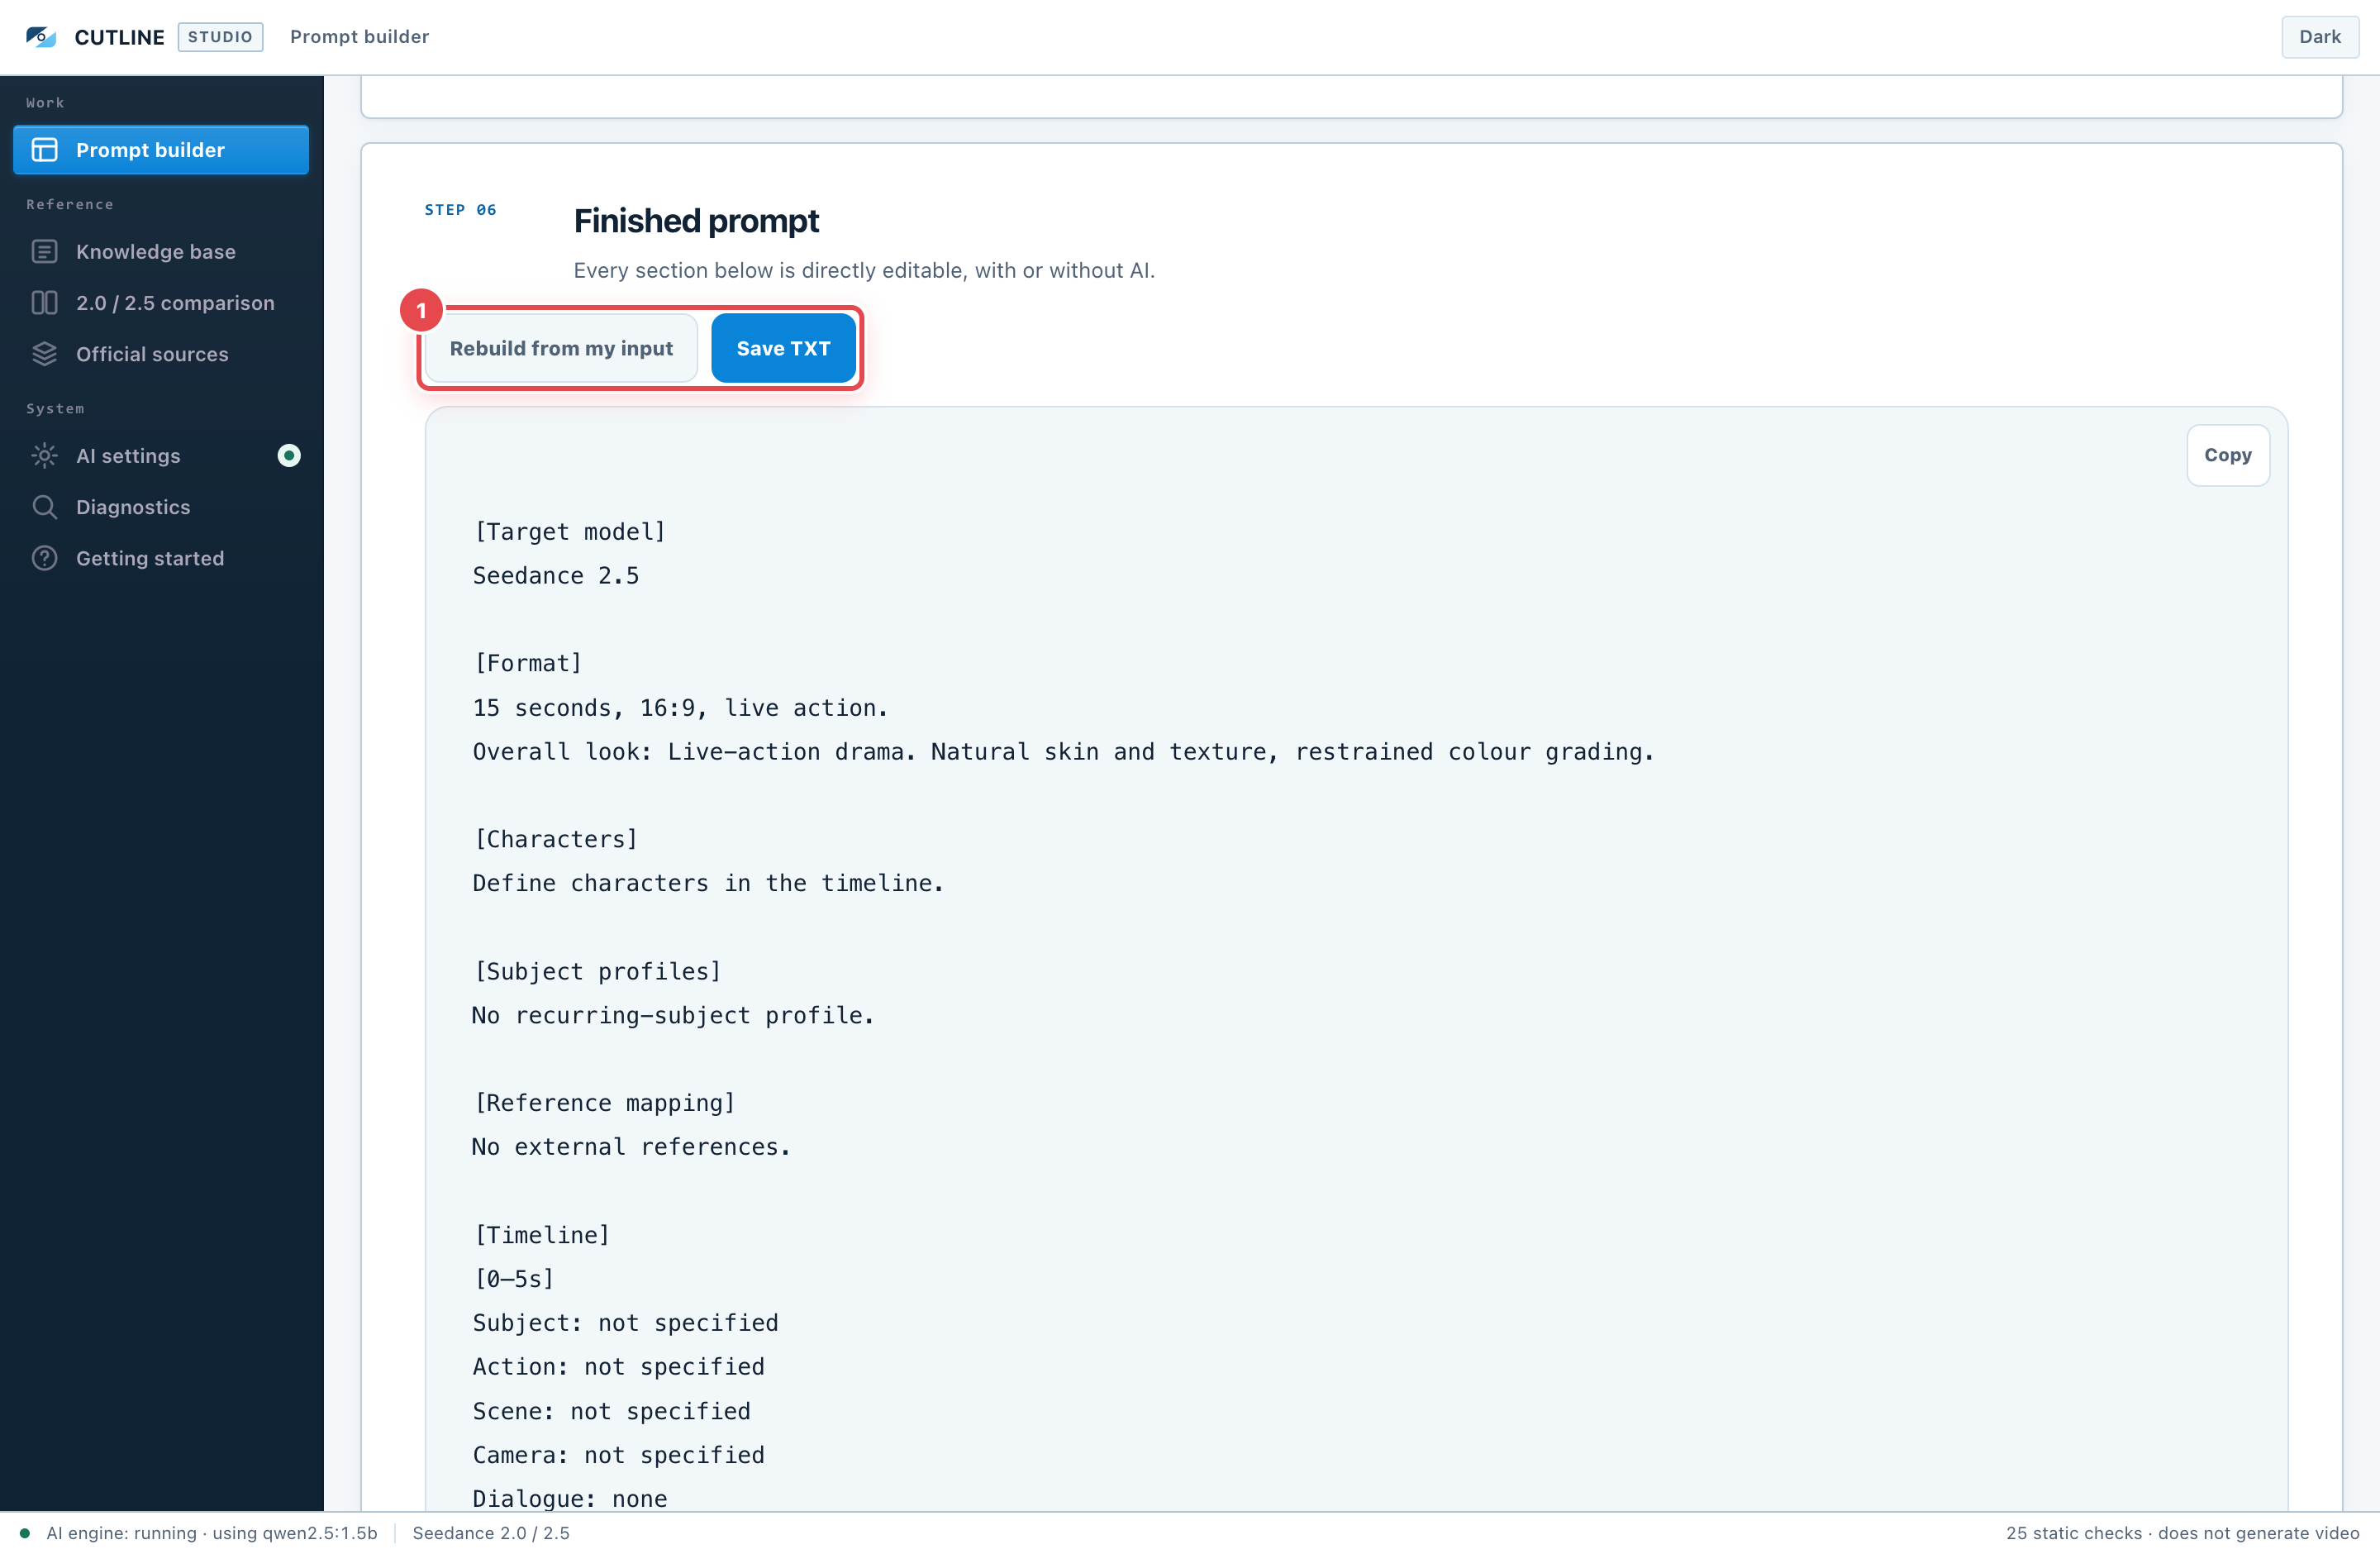
STEP 06 The finished prompt
Every section is assembled automatically from what you entered in the builder. The output field is directly editable.
- "Copy" puts it on the clipboard.
- "Save TXT" writes it out as a text file.
- "Rebuild from my input" discards your direct edits and regenerates from the builder.
STEP 07 Quality checks
Results are shown as "Error", "Warning", or "Info".
- Error: structural problems to fix first, such as exceeding the duration or overlapping beats
- Warning: conditions that often lead to failure, such as ambiguous references or a missing end state
- Info: things to verify for the target model, or production notes
Passing the static checks does not prove a generation of video or audio will succeed.
08 AI settings
You can use the knowledge base, the manual builder, the comparison, the checks, and saving without any AI. This screen is optional.
Every AI feature in this product runs on the local AI inside your computer. There is no external AI service contract, no API key to obtain, no credits to buy, and no metered billing.
"AI engine" vs "AI model"
| Term | Meaning |
|---|---|
| AI engine | The runtime that executes a local AI model on this computer. You set it up once |
| AI model | The AI itself — it drafts prose and designs prompts. It runs on the engine, and you pick one to match your hardware |
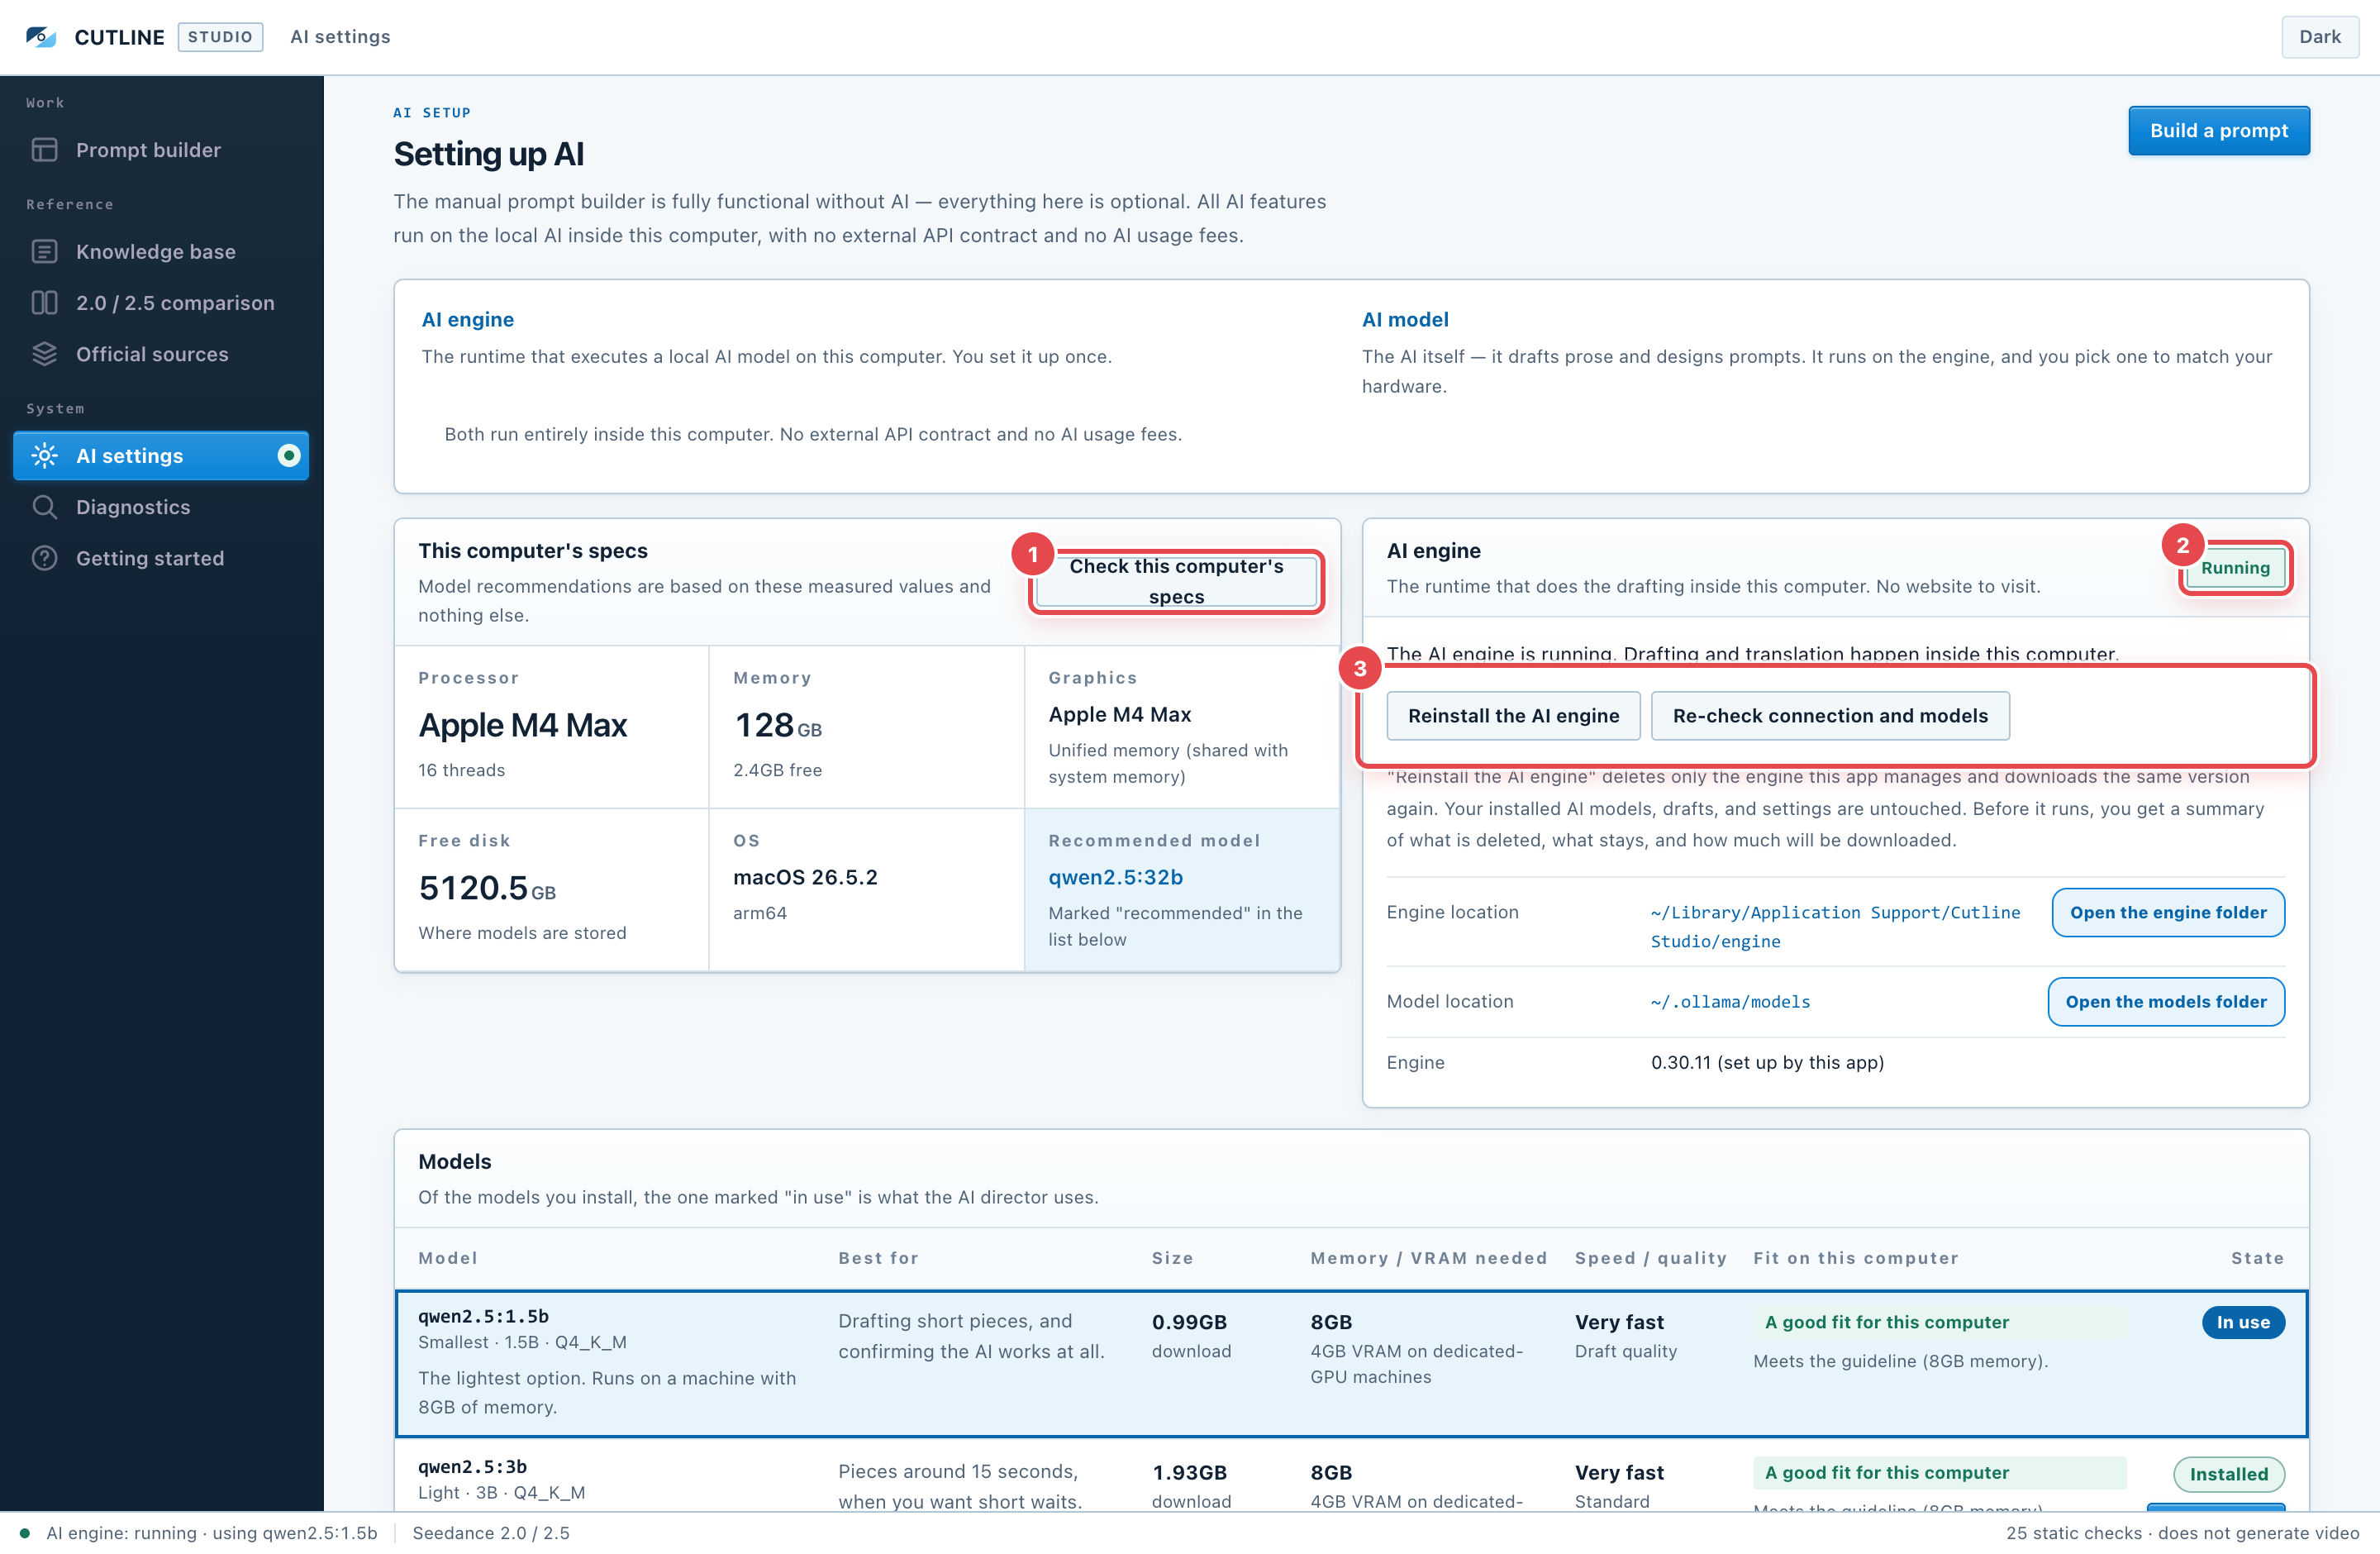
Start by pressing "Check this computer's specs"
The app measures installed memory, graphics, and free disk space, and works out which models will run comfortably here. The verdict appears in the "Fit on this computer" column of the model list below.
Local AI (recommended, free)
Drafting is handled entirely inside this computer. You do not need to visit a website or install another application.
- Open "AI settings".
- If the AI engine shows "Not set up", press Set up the AI engine. The app downloads, verifies, and starts it (a download happens on the first run only; the real size is shown on screen — roughly 1.5GB on Windows and 150MB on Mac).
- From the model list, install one model marked "A good fit for this computer".
- Once the state reads "Running", AI drafting is available in the builder.
Setup happens once, but right after you restart the computer, the AI engine starts out stopped. That is not a fault. Press Start the AI engine in AI settings and it returns to "Running" in a few seconds, with no download.
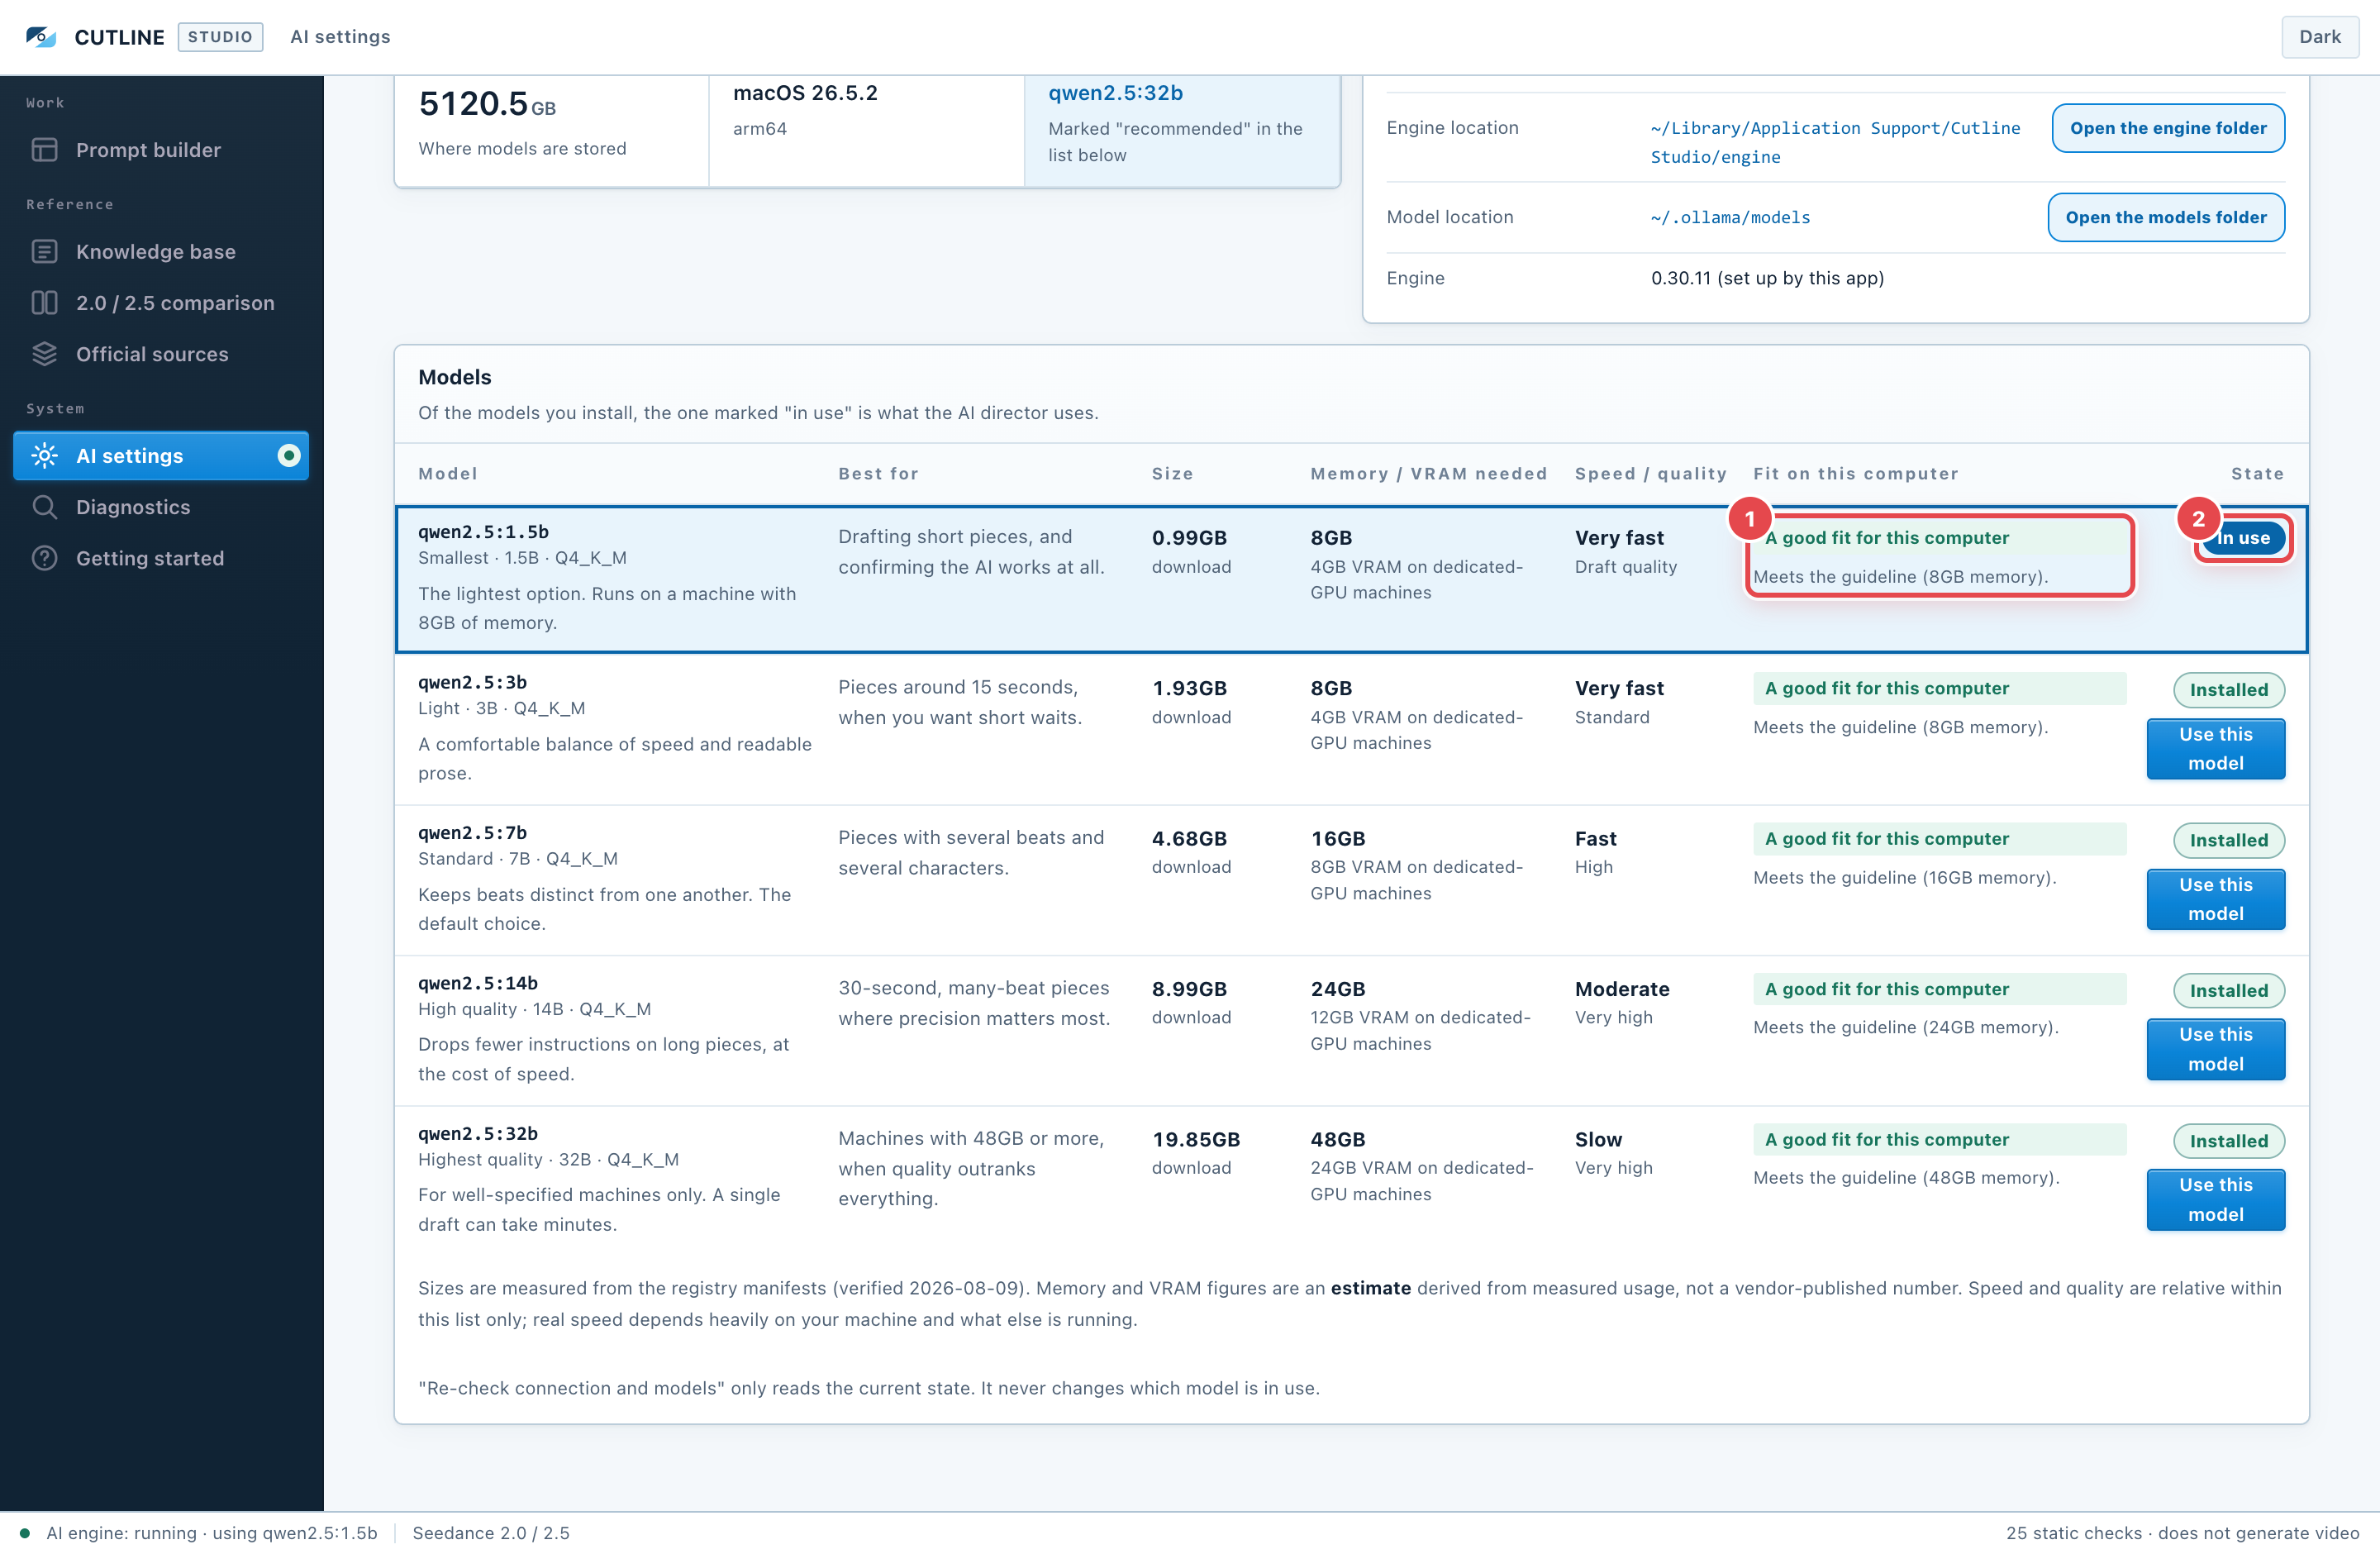
Choosing a model
| Label | Meaning |
|---|---|
| A good fit for this computer | Meets the guideline. Use it as-is |
| Runs, but without much headroom | It works, but long pieces mean longer waits |
| May run slowly | Heavy on memory and VRAM. You may need to close other applications |
| Will not run on this computer | Not enough installed memory. The install button is disabled |
When in doubt, take the one shown as the recommended model. You can swap models as often as you like. Leave the screen open while a download runs.
With a local AI, your brief and builder contents are processed inside this computer. Storing a model needs as much free disk space as the size shown.
Model states and switching which one is "in use"
Each row in the model list shows one of three states.
| State | Meaning |
|---|---|
| Not installed | Not downloaded to this computer yet. "Install" fetches it |
| Installed | Downloaded, but not currently selected. "Use this model" switches to it |
| In use | The model the AI director currently uses |
- Exactly one model is in use at a time, and the same choice is shared whether you switch it in AI settings or in the builder.
- "Re-check connection and models" only reads the current state. It never changes which model is in use.
- If the model in use becomes unavailable — because it was deleted, for instance — the app says so and offers the models you have installed. It does not switch on its own.
About "Reinstall the AI engine"
If the AI engine misbehaves, "Reinstall the AI engine" starts again from the download. A confirmation screen first tells you exactly:
- What is deleted: only the AI engine the app manages
- What is reinstalled: the same engine version this app is tested against, fetched from its official source
- What stays: your installed AI models, drafts, theme, and every other setting
- Download size: the real size, fetched from the source at that moment
- Reconfiguration: none. It starts automatically when finished
Opening the storage locations
"Open the engine folder" and "Open the models folder" in AI settings open those folders directly in Finder (Mac) or File Explorer (Windows). You never have to copy a path and hunt for it.
Using automatic drafting
- Type the video you want into the AI director field in the builder. Your brief is saved automatically and survives moving between screens ("New" clears it).
- Confirm which model is in use.
- Run it. While it runs you see the real stages (checking the connection → organising your input → generating the prompt → checking quality → done), an estimated percentage, elapsed seconds, and how many characters have been received. An LLM does not announce its total output in advance, so the percentage is an estimate against how much the previous run produced. It reaches 100% only on completion.
- Always re-read the basics, references, characters, timeline, and end state it filled in.
- Check the quality checks before using the finished prompt.
What the AI produces is a proposal. Do not assume character names, reference numbers, exact dialogue, or product information are correct.
Run time and stopping
- The first run of a local AI can take ten minutes or more on some computers, mostly loading the model. Later runs are much faster.
- Pressing "Stop" during a run ends the generation on the spot. Nothing in the builder changes.
- You can start another run immediately after stopping.
09 Storage, migration, privacy
Automatic saving
Your builder draft, your direct edits to the prompt, the theme, the brief you typed into the AI director, and the AI model in use are all saved inside the app. They are restored the next time you open it.
Save JSON
Save any project you plan to keep as JSON. To move it to another Mac or Windows machine, restore the JSON with "Load".
Automatic saving is per computer and per OS account. To move, use Save JSON on the source machine and "Load" on the destination.
Save TXT
Use Save TXT when you only need to hand over the finished prompt.
What goes over the network
| Action | Sent externally |
|---|---|
| Browsing the knowledge base, manual builder | Nothing |
| Save JSON / Save TXT | Nothing |
| Local AI generation | Nothing. Processed inside the computer |
| First download of the AI engine and models | Fetches the engine and models from their official sources (nothing of yours is sent) |
| Opening an official link | Connects to that link in your default browser |
There is no way to upload reference images, video, or audio into this app.
10 Common problems
Open "Diagnostics" first
When something is not working, open Diagnostics in the left rail first.
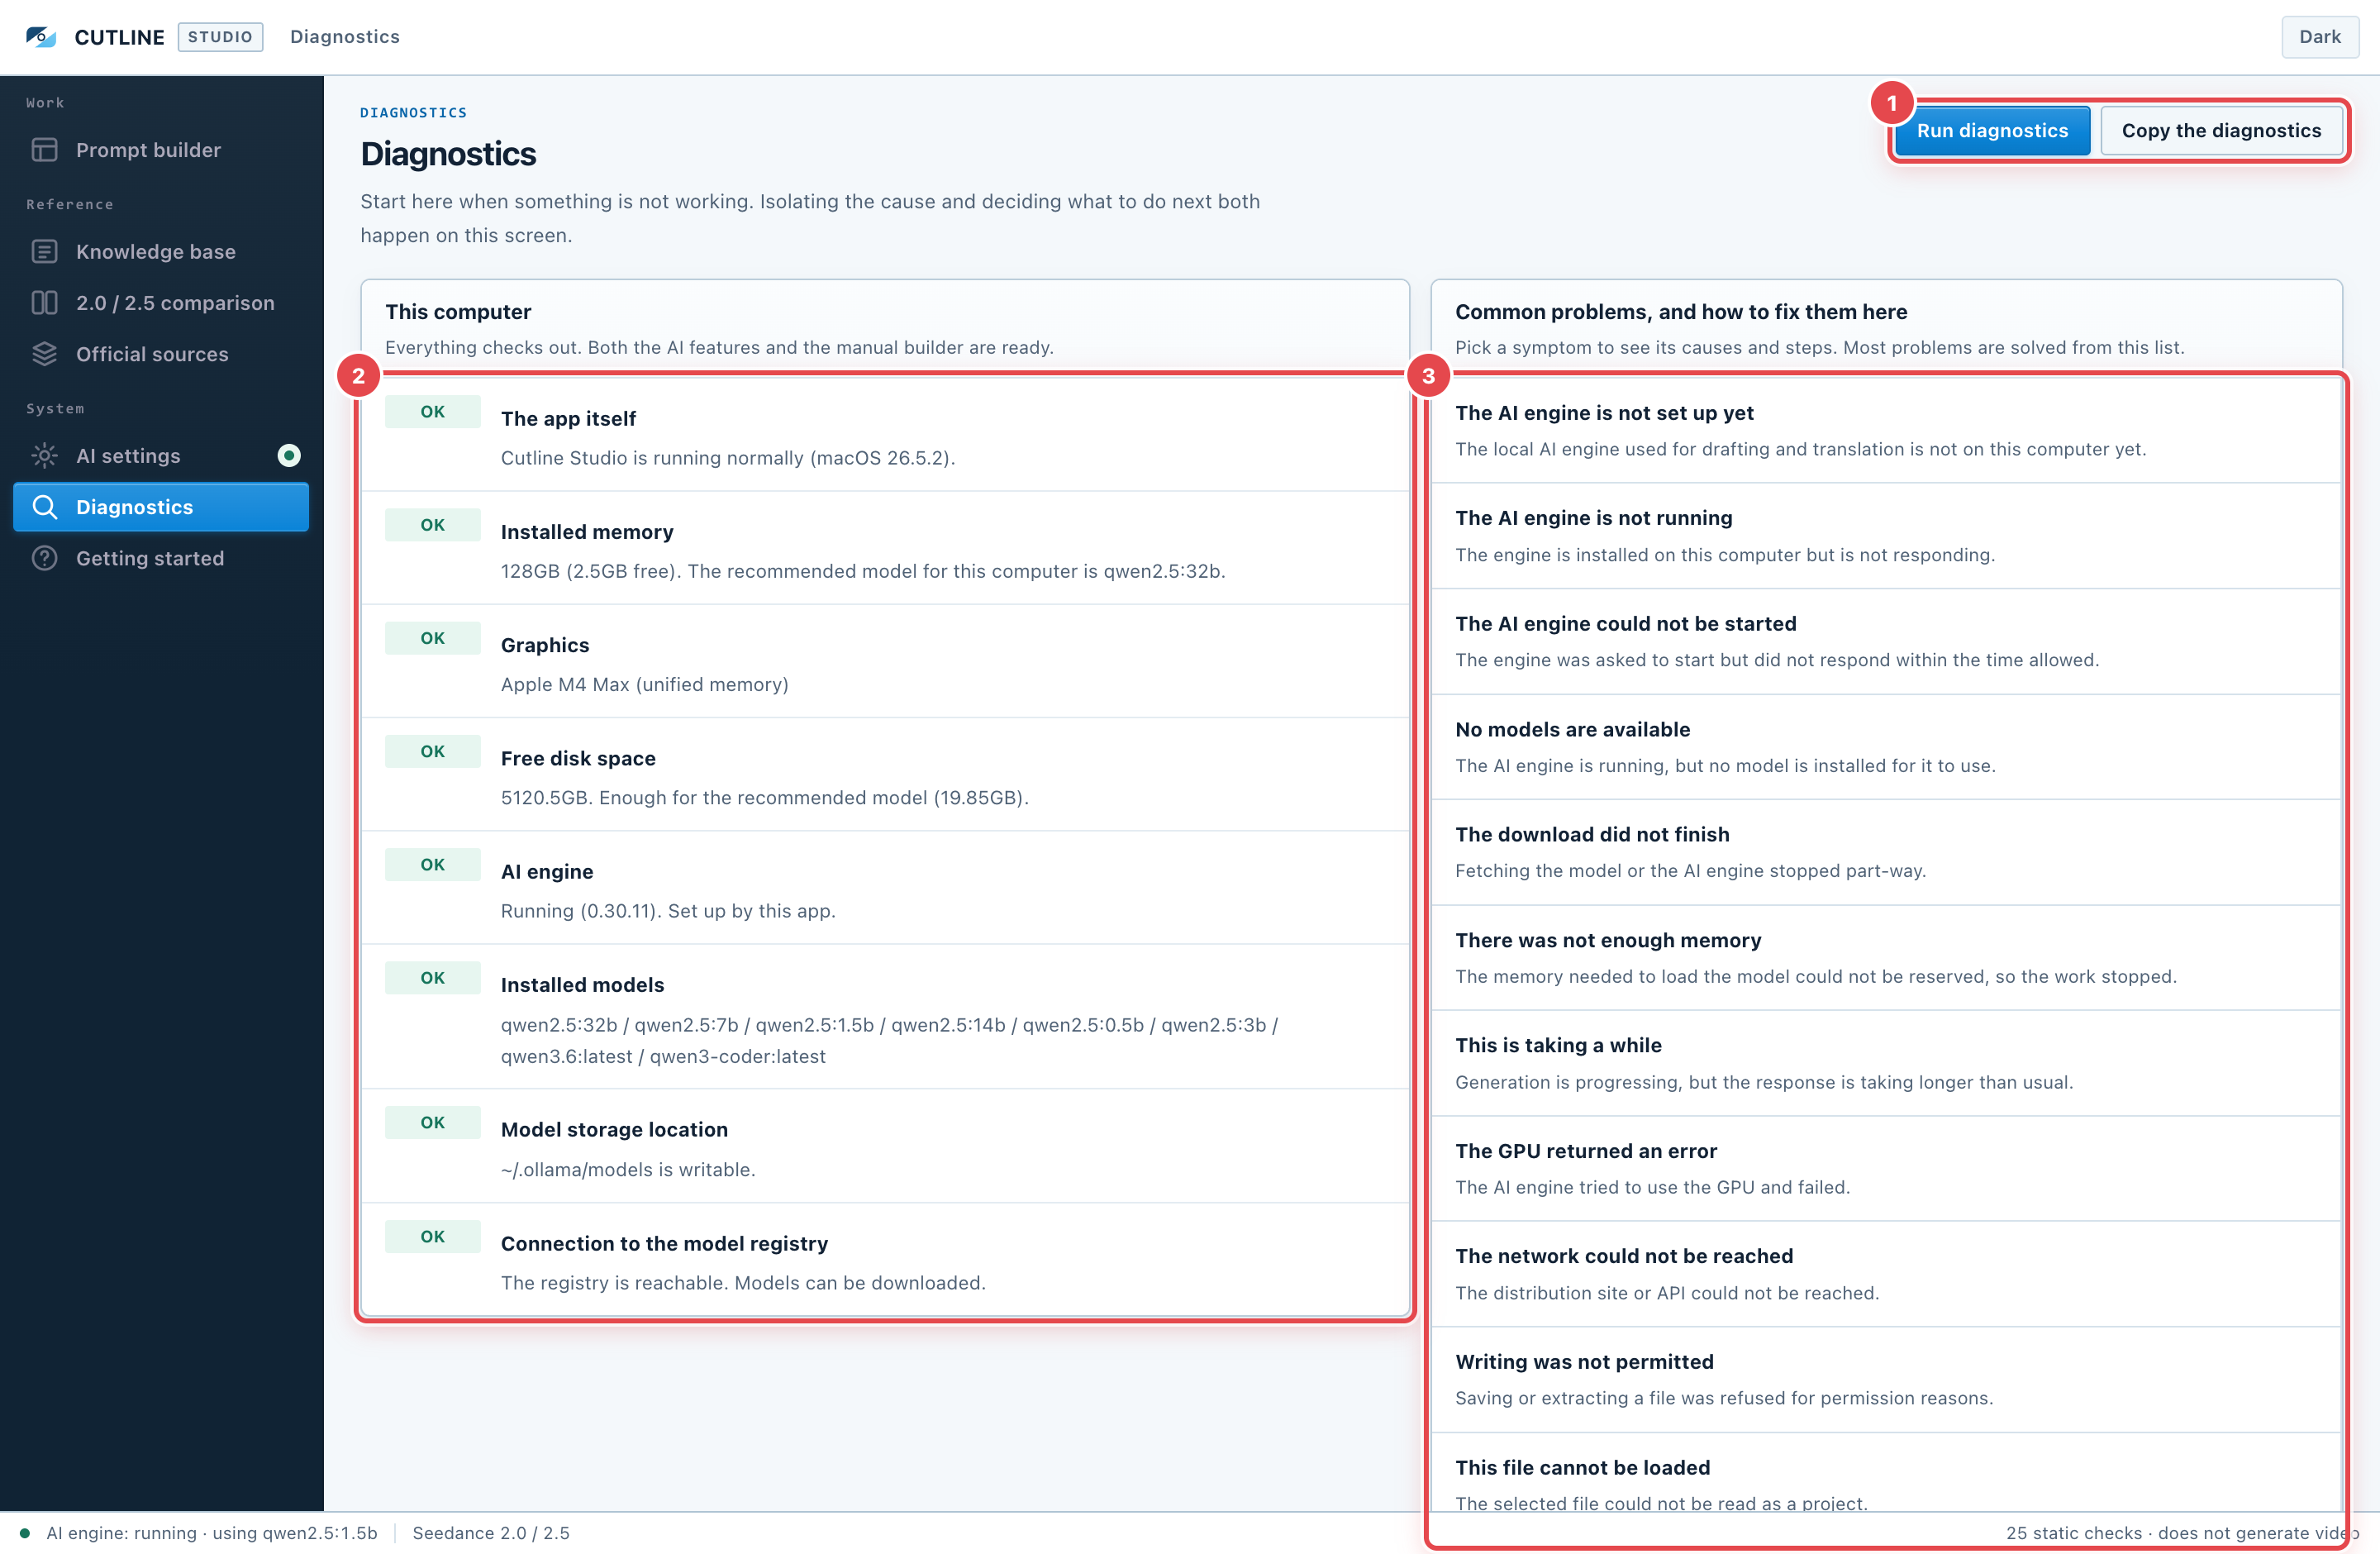
- "Run diagnostics" checks memory, free disk space, the AI engine, and the network on the spot, and shows "What to do next" for anything that needs attention.
- Pressing a symptom opens "What happened", "Likely causes", "What to do next", and buttons you can press right there.
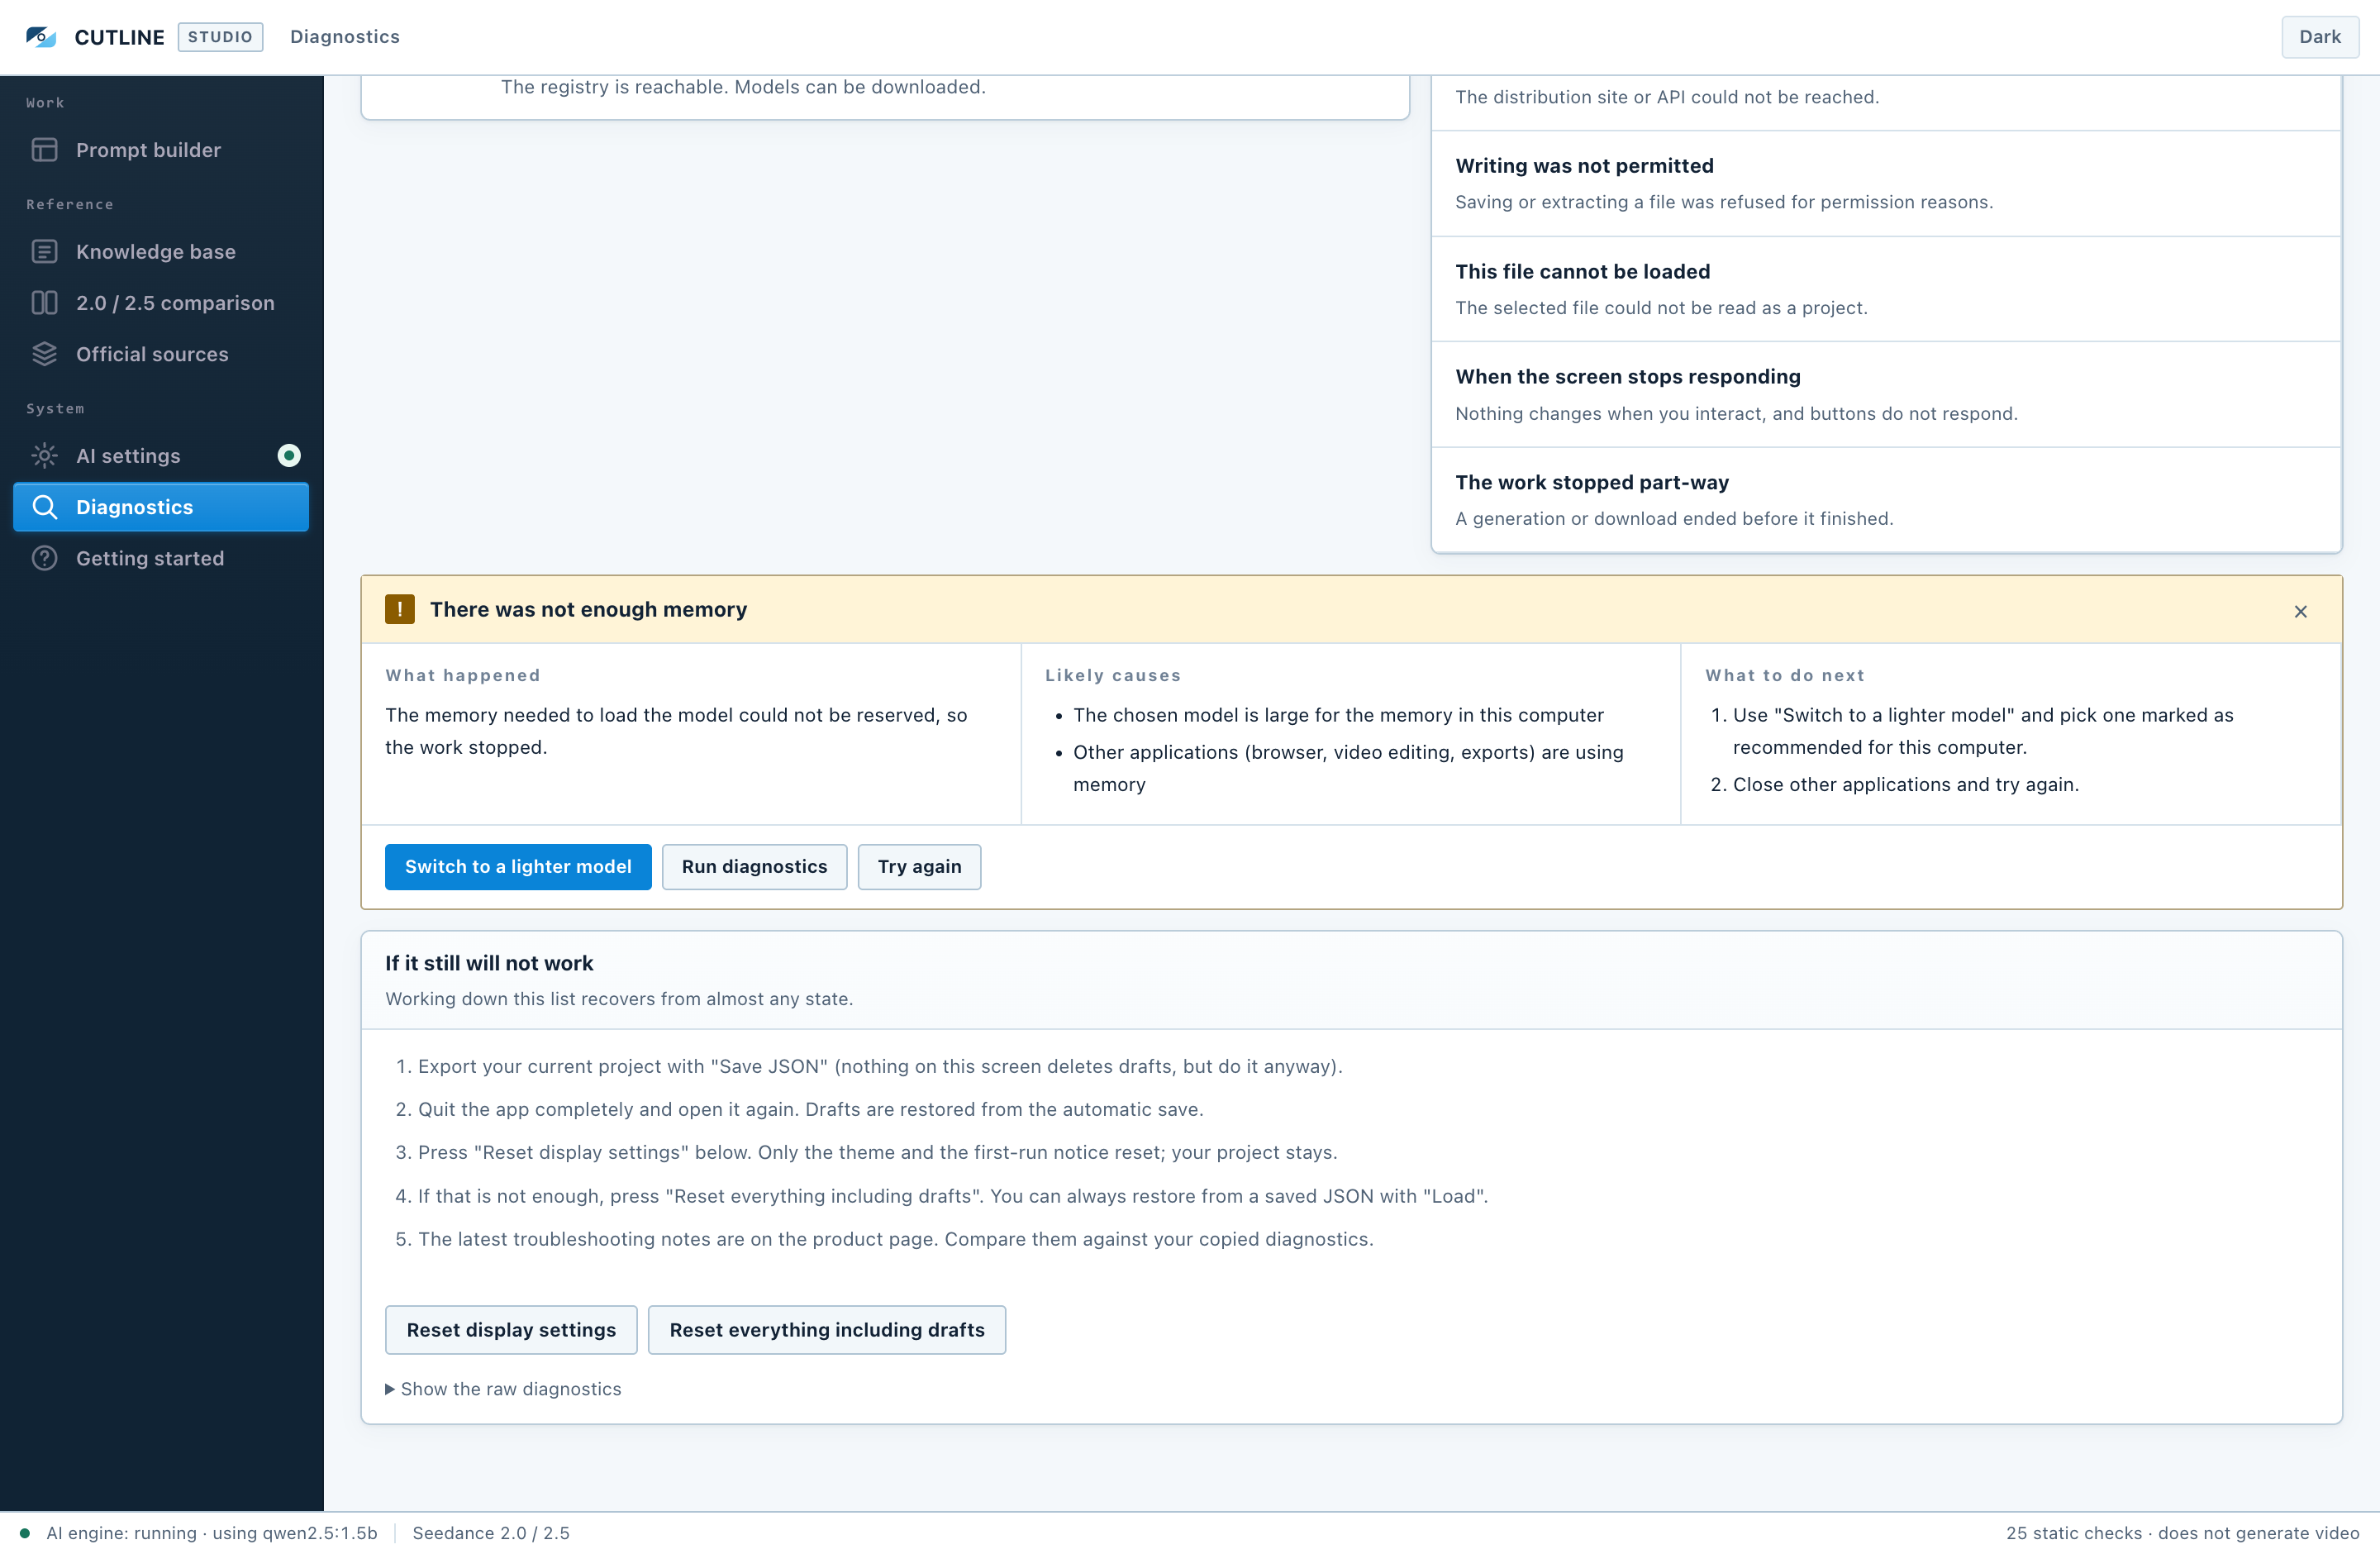
Errors work the same way. You never get only an error code — the screen always tells you what to do next. The cases below are the most common.
The app will not start
- Check that installation finished.
- If a copy is still running in the background, quit it and start again.
- Check the filename and version against the download page.
- Note the OS, the app version, and the error shown (to compare against the troubleshooting notes on the product page).
- Check whether security software is blocking it.
- Restart the computer, then open the app again.
- If that does not help, uninstall (chapter 11) and reinstall. Your drafts survive.
The AI engine shows as unavailable
- Open "AI settings" and read the state. If it says "Not set up", press "Set up the AI engine".
- If it says "Stopped", press "Start the AI engine". It always starts out stopped right after you restart the computer. That is not a fault — the button brings it straight back, with no re-download.
- Check that a model finished installing.
- Check whether security software or a corporate policy is blocking local connections.
The builder contents disappeared
- Check that you have not opened it under a different OS account or on a different computer.
- Check that you have not run an OS or app data-clearing function.
- If you have a saved JSON, restore it with "Load".
11 Uninstalling
Before uninstalling, save anything you want to keep as JSON. Files you saved as TXT or JSON are not deleted by a normal uninstall.
Mac
- Extract
Cutline-Studio-Uninstaller-macOS-English.zip. - Open "Cutline Studio Uninstaller".
- Only if you also want to erase the app's automatic saves, tick "Also delete settings and automatically saved data".
- Press "Uninstall".
- Grant administrator permission if macOS asks.
If you keep the settings, your earlier drafts are available again after reinstalling. Once uninstalling is done, you can move the uninstaller to the Trash.
Windows
Use either:
- "Uninstall Cutline Studio English" in the Start menu, or
- Settings > Apps > Installed apps > Cutline Studio English > Uninstall.
A normal uninstall on Windows keeps the app's data so a reinstall can use it. To remove everything, back up your JSON files and then delete %APPDATA%\Cutline Studio English.
12 If it still is not solved
Everything you need is in three places: this manual, "Diagnostics" inside the app, and the product page. Most problems come out in the following order.
Last-resort sequence
- Save your project as JSON.
- Quit the app completely and restart it.
- Check whether the same steps reproduce it.
- Use "Run diagnostics" on the Diagnostics screen to see what needs attention and what to do next.
- Try "Reset display settings" on the Diagnostics screen (your project stays).
- If that is not enough, run "Reset everything including drafts" and restore from your saved JSON.
- Troubleshooting notes and updated builds, when published, are available from the product page you bought from.
When the displayed specification differs from reality
The duration or reference limits shown in the app can disagree with the service you are using. Seedance and ByteDance change specifications, and the app's model information can fall behind the service's own screen. When that happens, work from the service's current display. The numbers or the model name may differ, but the way you assemble a prompt does not change, so you can carry on as normal.
Do not share these
If you post an error somewhere, or write it down, leave out:
- Passwords and authentication codes
- Unreleased video, images, or audio themselves
- Personal information, or material involving someone else's rights
13 Licence and terms
About the licence
The paid edition of Cutline Studio is licensed one computer per licence.
To use it on more than one computer, buy one licence per computer.
| Computers in use | Licences needed |
|---|---|
| 1 computer | 1 licence |
| 2 computers | 2 licences |
| 3 computers | 3 licences |
The count is the number of computers actually in use, not whether they are Mac or Windows. One person using a Mac and a Windows machine needs two licences.
Prohibited
Sharing, transferring, or redistributing the application to third parties is prohibited, as is reverse engineering, decompiling, or disassembling it in order to obtain or reuse its internal implementation.
Specifically, this covers:
- Sharing, transferring, redistributing, or reselling the application (including installers) to third parties
- Providing the application to anyone who has not bought it
- Reverse engineering, decompiling, or disassembling it to obtain its internal implementation
- Modifying it to circumvent licence limits
- Analysing or reusing its internal implementation in a similar product
What you may do
- Prompts you create with this app are yours to use for personal or commercial work without restriction. Rights and terms for your input assets, third-party content, generative AI output, and the services you use remain with their respective owners and providers.
- JSON and TXT files you create are yours to save, move, and share freely (the restrictions apply to the application itself).
- Within one licence, reinstalling on the same computer or migrating to a replacement computer is fine.
Attribution
Cutline Studio is an independently developed prompt design tool. It is not supplied or endorsed by ByteDance, Seed, Dreamina, or BytePlus. Names such as Seedance are used to identify the models this tool supports. All names and trademarks belong to their respective owners.
The trial edition, Cutline Free, has no limit on the number of computers. The "one licence per computer" rule above is a condition of the paid edition.